Cookie Decorating Classes with Melissa Joy Cookies!

Summertime for Melissa Joy brings the opportunity to not only take cookie orders, but offer cookie decorating classes as well! I’ve got two different options at this time. One is for those who just want to have a little creative fun with a group of friends and the other is for those who’d like an introduction into the art of cookie decorating.

summer cookies

I am located in the La Crosse, WI area, so most classes will be conducted here with site to be determined by the number of students interested. I do have a few connections on the other side of the state, therefore additional locations could be possible!

watermelon slice cookies

Cookie Decorating Parties

Cookie parties are a super way to get together with your friends and have some sweet, creative fun! 

A two hour party includes decorating instruction, cookies, icing and tools needed to create a 6 to 8 pre-designed set. Cost is $50 per person, with a minimum of 5 participants. If you are hosting the party, your fee is complimentary! 

These parties will be held in your home, so living in or near the La Crosse, WI area is ideal. Participants must pay in full one week before the party date to secure a spot. Refunds will not be accepted after that time, but your spot can be filled by another person. For further inquiries and availability, email melissajoycookies@gmail.com.

Class FlowerJar Set

Cookie Decorating Workshops

Cookie decorating workshops with Melissa Joy are a more in-depth introduction into creating artfully decorated cookies. This 3-4 hour class will cover how to make royal icing and its consistencies, as well as techniques including simple flooding, wet-on-wet, brush embroidery, swirl roses, working with transfers or painting on cookies. Little nuggets of wisdom will be sprinkled throughout! Each participant will also go home with a few tools to start their decorating journey.

Cost per workshop is $100. Participants must pay in full at least one week before class date to secure a spot. Cancelations will get a partial refund after that time, but spot can be transferred to another person. For further inquiries and availability, email melissajoycookies@gmail.com.

Any other questions about classes or ideas for what you’d like to learn are welcome!

lemonade jar

Cookie decorating is a fabulous creative outlet for anyone who wants to give it a whirl. Whether it’s just for a night of fun with the ladies, or the start of your new, delicious hobby, I’d love to share the joy of decorating cookies with you!

Poinsettia Wreath Cookies

You guys, it’s been SO LONG since I’ve had the chance to blog, I almost forgot how to post tutorials on here! I’ve been more focused on the selling side of Melissa Joy these days, so the “how-to cookie” stuff tends to fall by the wayside. I’ve added a gallery of my work to the menu bar, organized by category, for those more interested in what I’ve created recently. That is still a work in progress. I’m better at baking than I am at this web junk, but I’ll get there!

poinsettia-wreath

For today, I’ve created a tiny tutorial on how to make my pretty poinsettia wreath cookies! Hallelujah! And if you’re a cookie decorator, brief and to the point during the month of December is a good thing. This tutorial is also for my own reference, because next year I’ll need a refresher on how to create them again for sure. #midlifebrain

Here is a picture diary on making Christmas poinsettia wreath cookies! Starting with a favorite cookie recipe and ivory colored royal icing…

step-1-and-2

I used that round cookie cutter as a guide to draw the circles. I’m ornery like that.

step-3

I used a #2 tip to create the poinsettias. Start with the tip at the center of the flower and drag it out. I have some fabulous, sparkly gold sprinkles I got from CookieCon for the middles, but yellow nonpareils would be great too.

step-4-5

step-6

And done! These do take some time and patience to produce (as most decorated cookies do, right?!), but I love them so much. Definitely one of my faves this season!

poinsettia-wreaths-group

Merry holidays to you, my friends. I hope I get back here to share another tiny tutorial with you before next Christmas. 😉 Until then, happy baking…or more importantly, happy cookie EATING!

Easter Egg Cookie & Jelly Bean Tic-Tac-Toe!

I have made many cookie tic-tac-toe sets. They consist of a giant cookie “board” and LOTS of cookie minis of various designs, but these guys…so much easier! Just one large egg cookie with a side of jelly beans, and you’ve got yourself a sweet treat of fun for the Easter baskets!

egg cookie tic tac toe

A brief low-down on how I created them starts here…

IMG_3143

I began with a flooded, 4 inch egg shaped cookie. Once the icing is fully dried (these set up over night), I used a fan brush and white Americolor straight from the bottle to speckle it. One hand holds the brush several inches above the cookie, while the other hand taps the handle so the white splatters onto it. And splatters all over the table. And all over you. You’ll be a flocked mess, but I’m telling you, it’s so darn satisfying!

Next pipe a grid pattern on the egg cookie. Place the cookie in a bowl and pour sprinkles over it. Those nonpareils like to bounce, so a deep bowl is great for this step. Once you pipe the grid, work fast before the icing has a chance to set up or the sprinkles won’t stick!

IMG_3153

I added a little bead border around the egg cookie to dress it up, but it’s not necessary.

DSCF1558

Gather a handful of jelly beans and a willing opponent, because your Easter Egg Tic-Tac-Toe cookie is ready for playing!

easter egg cookie tic tac toe

I can’t wait to share these with all the little friends I know…

Easter Egg Cookie & Jelly Bean tic tac toe

Happy Spring, and have a wonderful Easter!

Leprechaun Cookies for St. Patrick’s Day!

St. Patrick’s Day is only a few days away! If you are a baker and you’ve put off wondering what to make for this Everyone-is-Irish holiday (as I have put off writing this post), then I am here to finally help you out. Time’s a wastin’, so lets begin!

Leprechaun Cookies by Melissa Joy Cookies

Things you will need to make these Leprechaun cookies:
Ice Cream Cone cutter, or similar shape
Green Icing
Orange Icing
Flesh icing
Wilton Shamrock Mix Sprinkles
Green food writer (I use FooDoodlers)
Black food writer, or black icing

ice cream cone cutter

My leprechaun design started by tracing an ice cream cone cookie cutter on paper and a creating few sketches as a guide. This particular cutter came from a Wilton Ice Cream set.

leprechaun cookie how to

Once your cookies are baked and cooled, form the beard and hat as shown. Leaving a bit of drying time in between each section will keep them segmented, which was the look I was going for. Not necessary, but just an option!

leprechaun cookie how to

You can place a gold sprinkle on the hat while the icing is still wet, or you can add it later with a drop of icing to “glue” it in place. I didn’t end up using the shamrocks, but have a go with them if you’d like them as decoration instead!

leprechaun cookie how to

Next fill in the face. Let dry several minutes, then add a nose. The cookie should dry overnight before adding any details with food writers, unless you plan to complete the rest with icing.

leprechaun cookie how to

The following day I outlined the beard and hat with coordinating colors, and added most of the facial features with black icing.

leprechaun cookie how to

Using my FooDoodlers, I drew a hat band in green and gave this guy eyebrows. In hindsight, I should have made the brows with orange icing instead, so go ahead and do so, because he will probably be cuter that way! 🙂

Leprechaun Cookies by Melissa Joy Cookies

So who gets lucky? The one who receives a few handsome leprechaun cookies this St. Patrick’s Day!

“May your pockets be heavy and your heart be light. May good luck pursue you each morning and night…”

Easy Halloween Skeleton Cookies

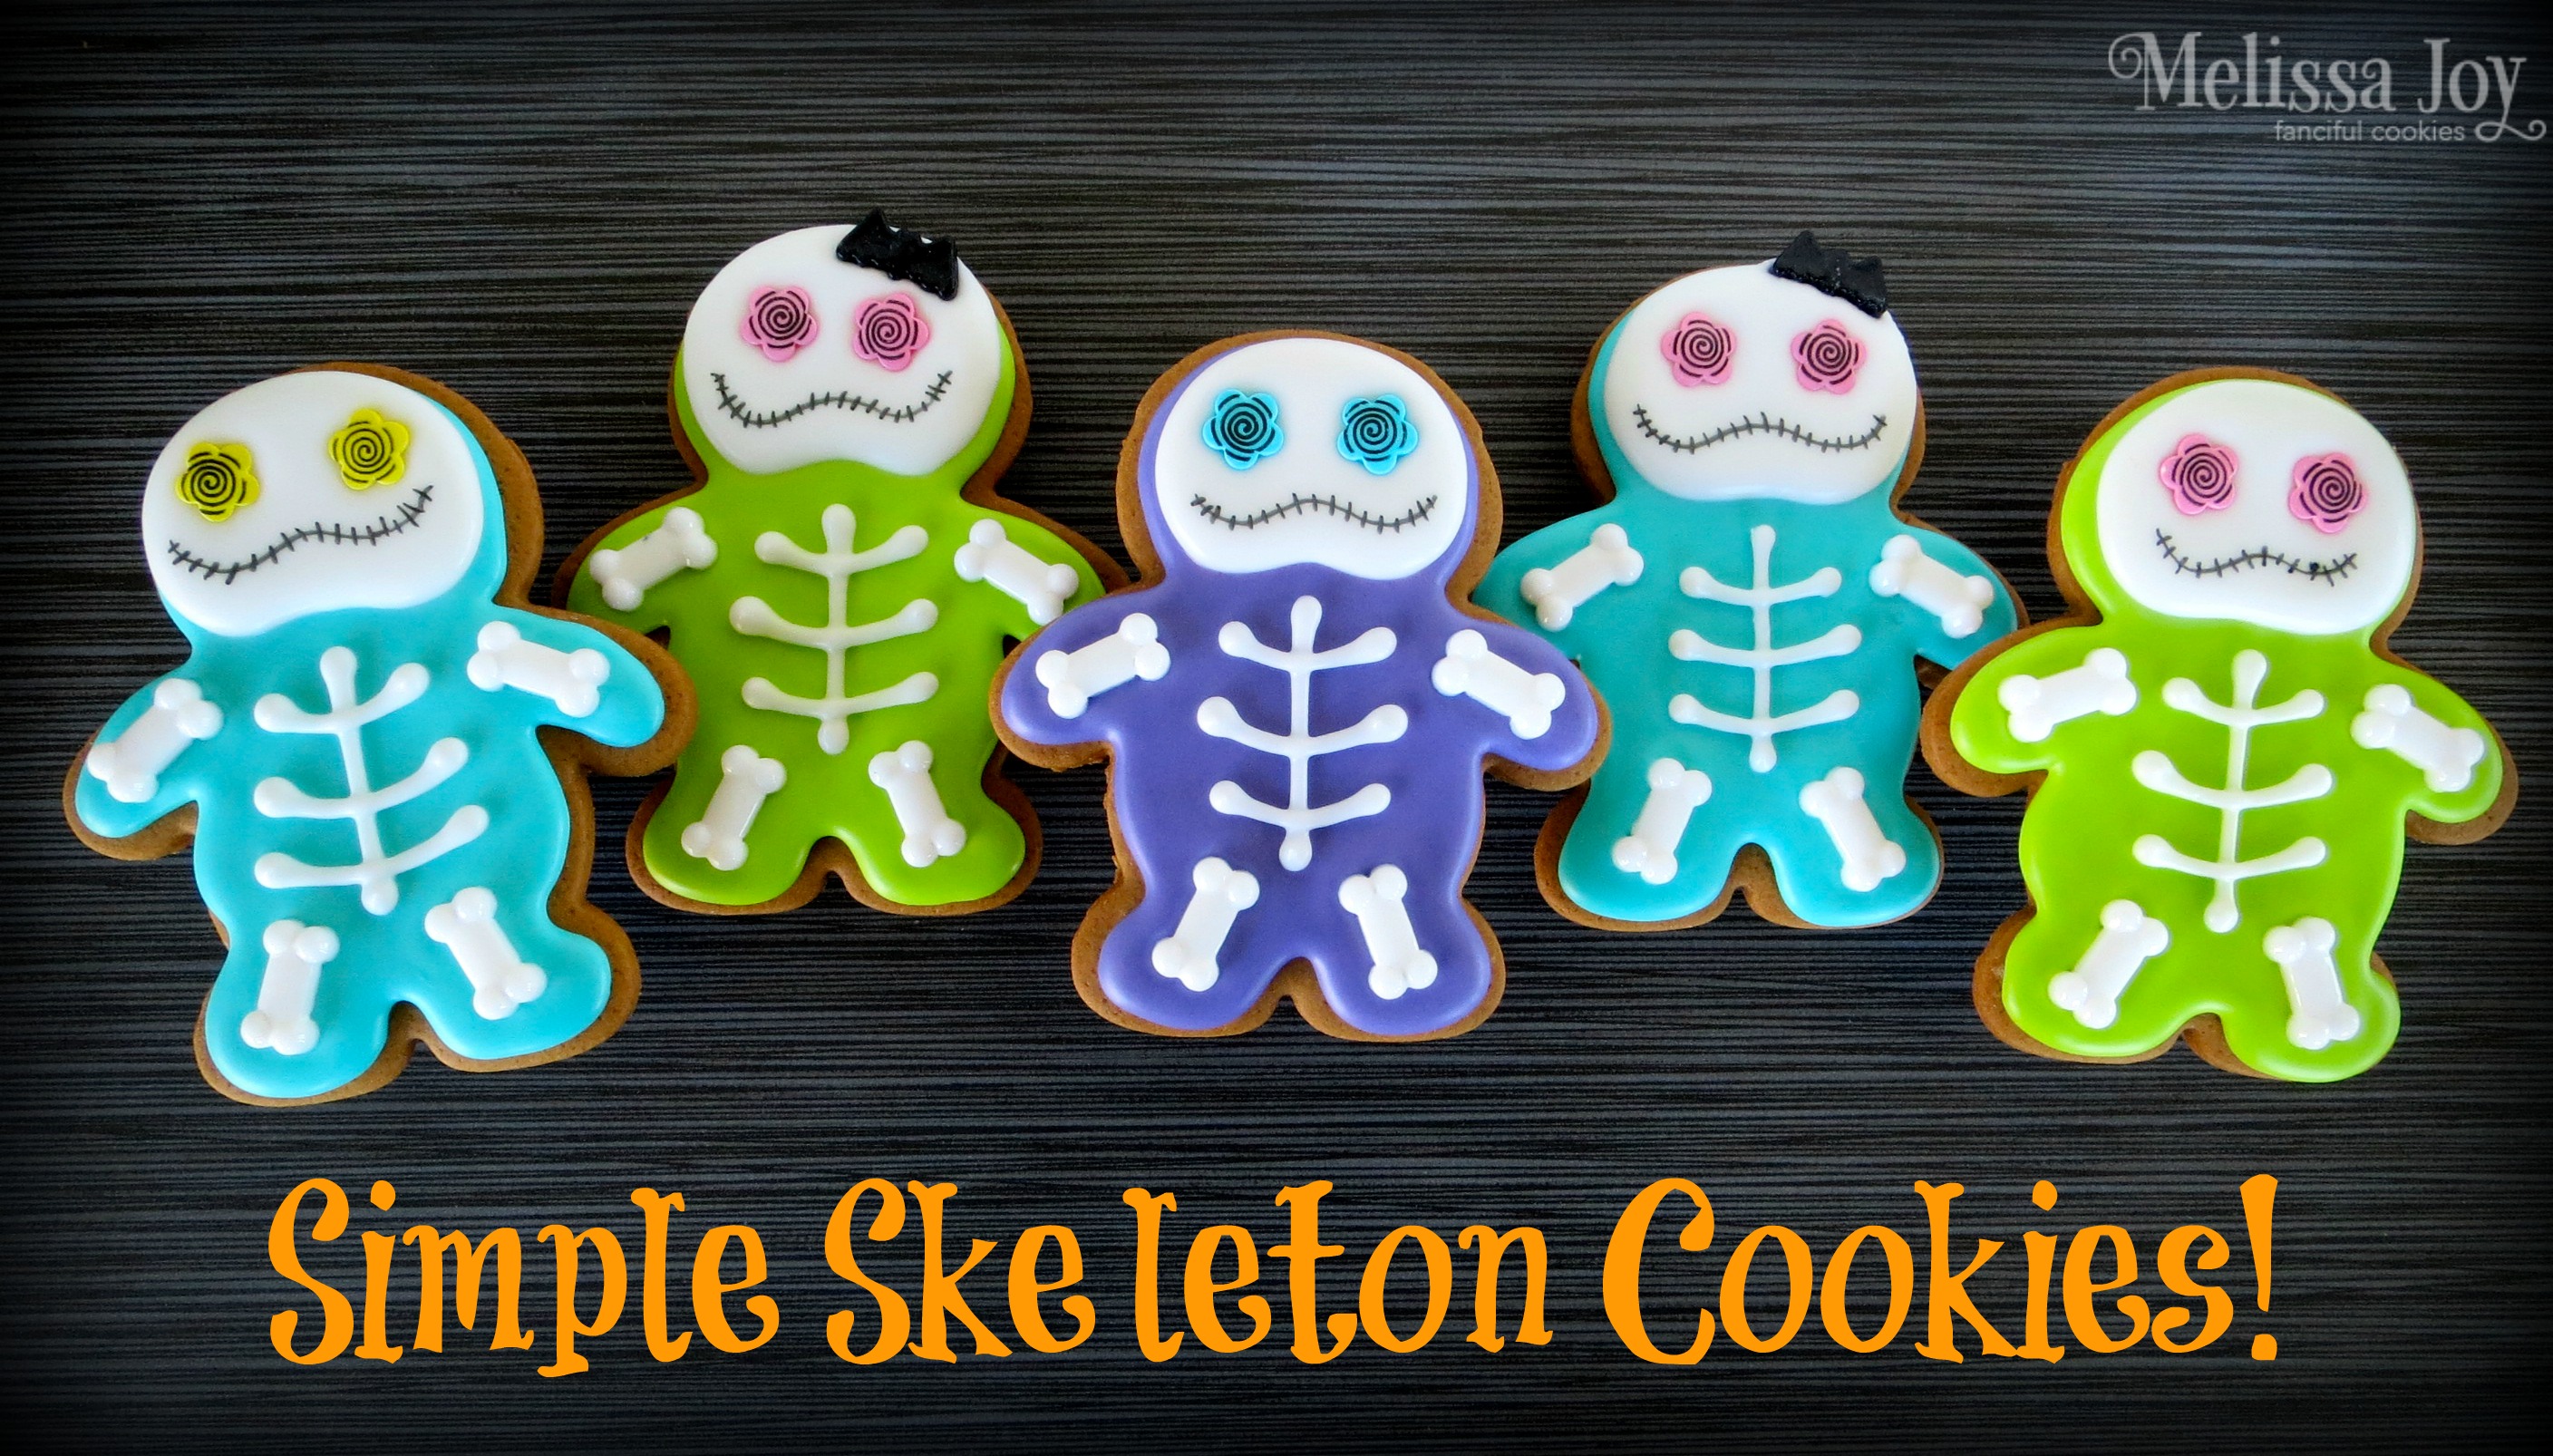
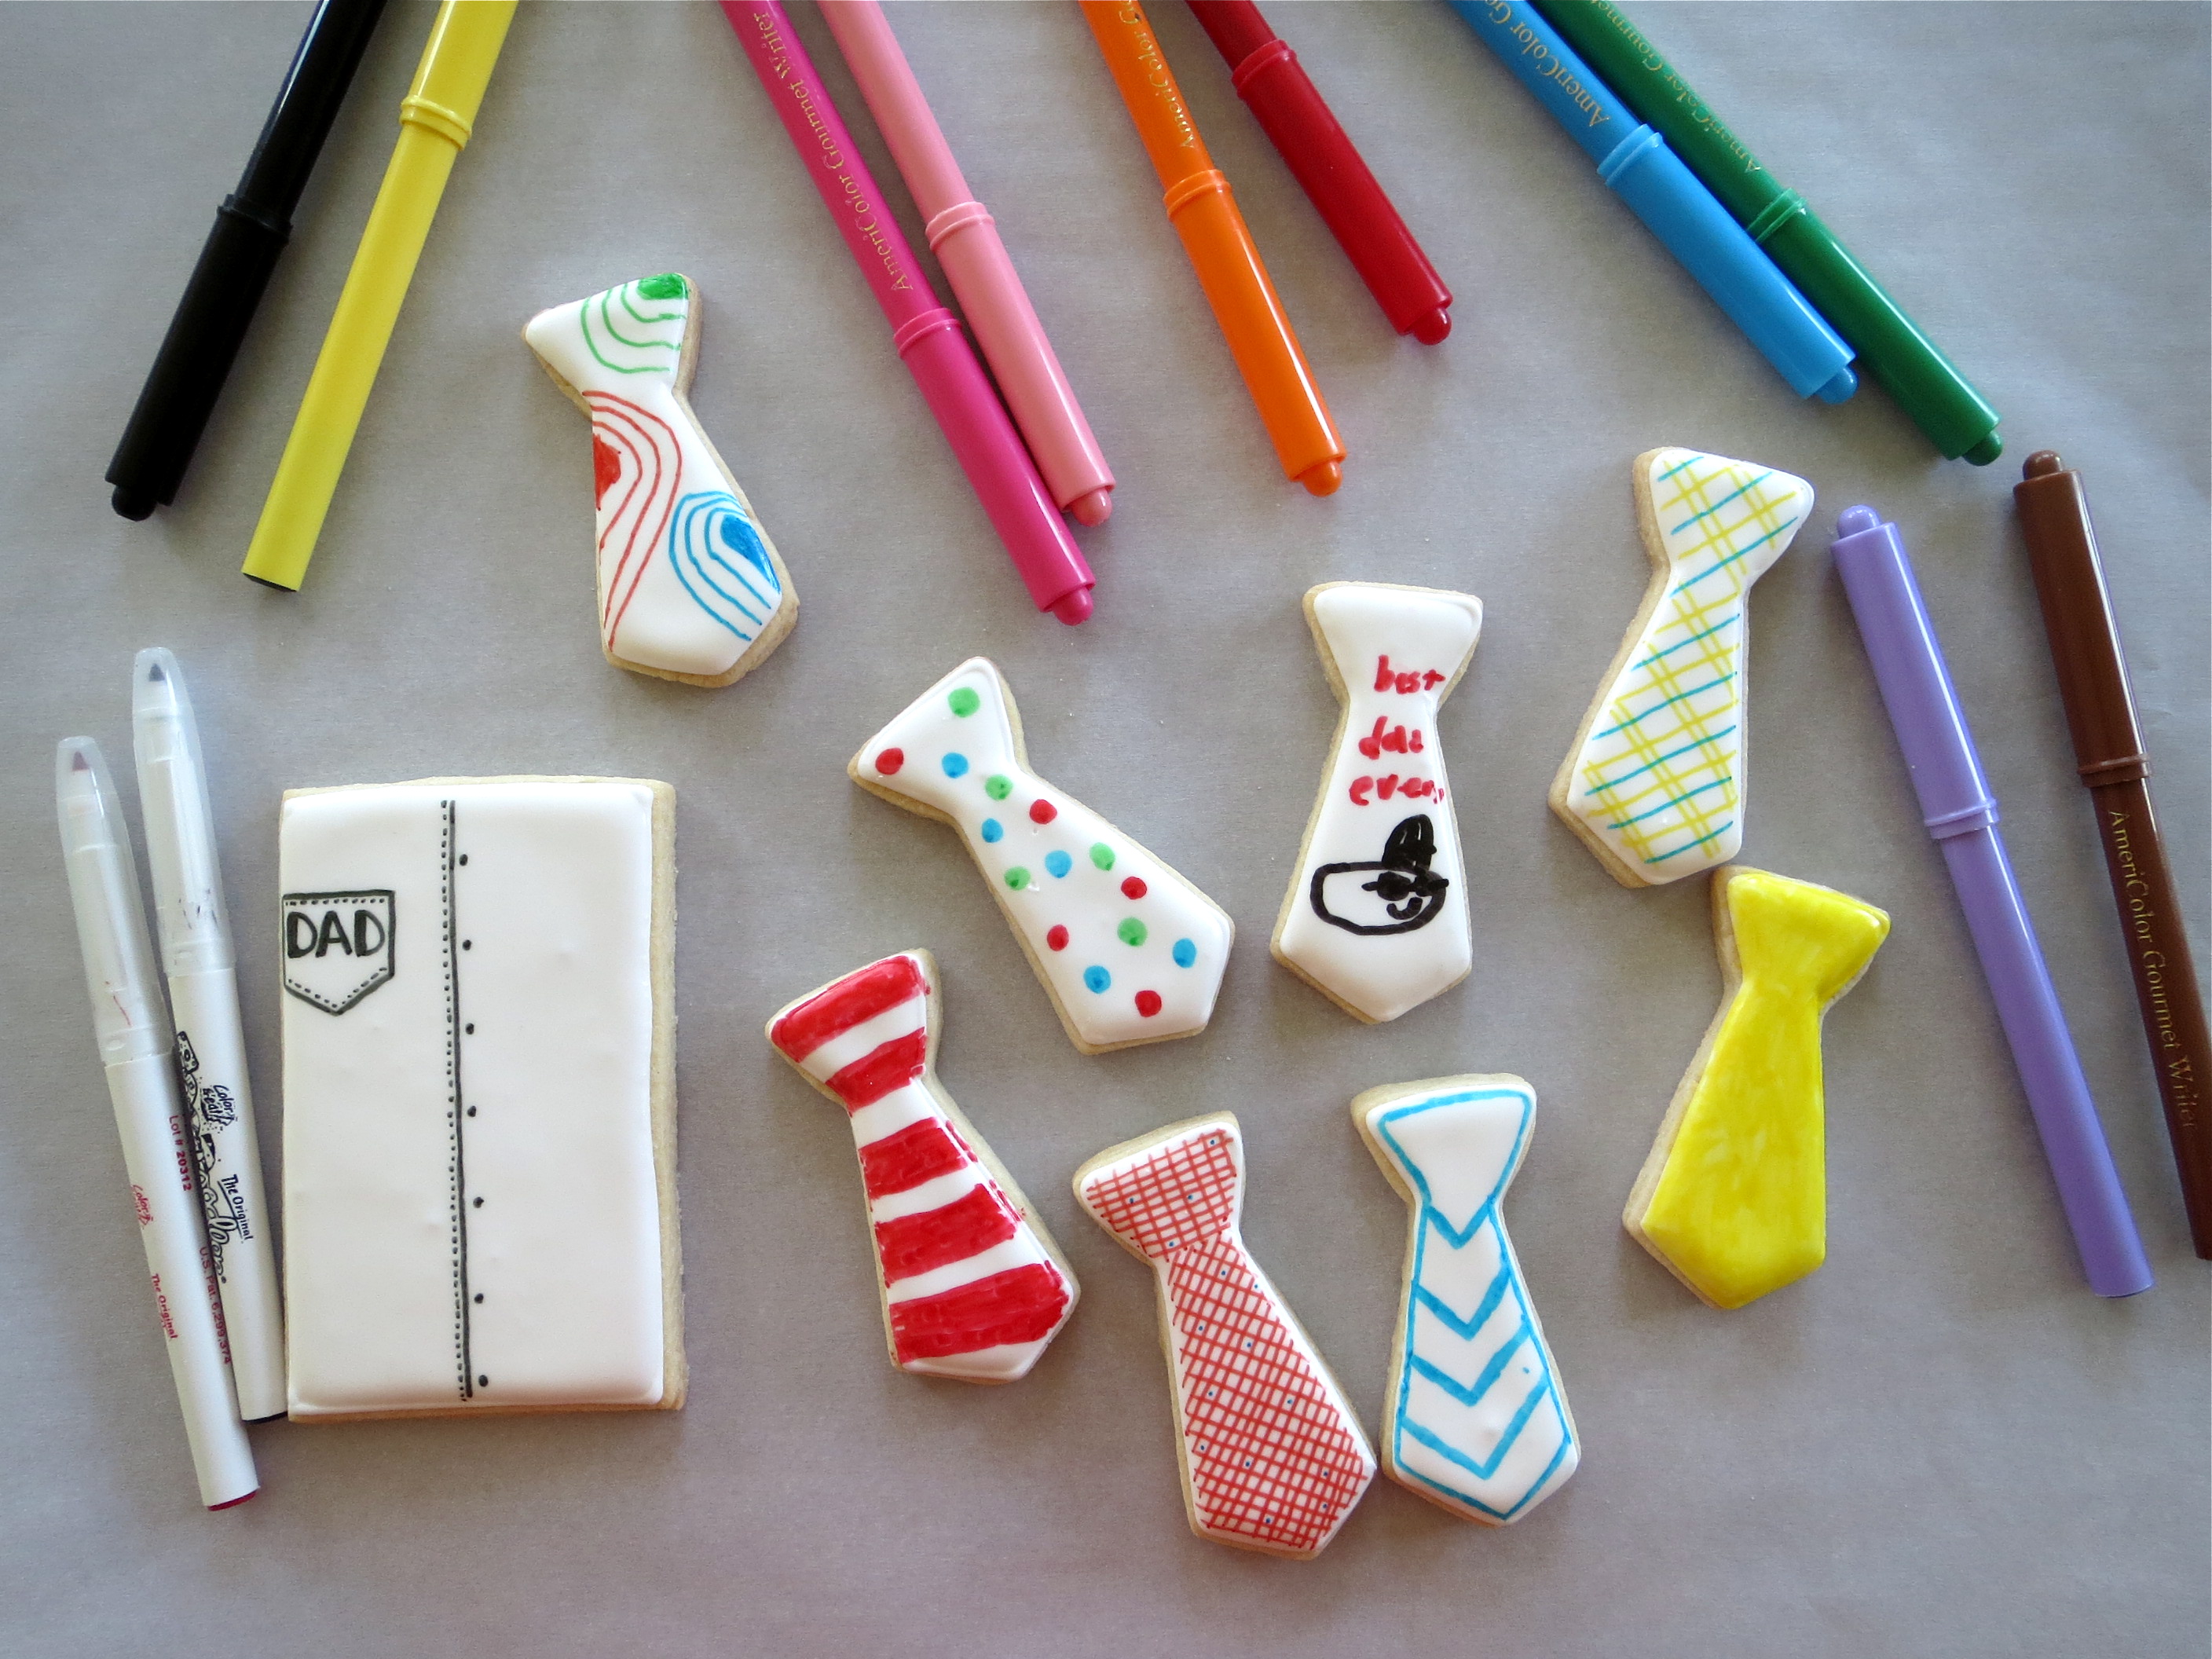
The Halloween season is upon us! If you are looking for a quick and simple cookie treat that is all cute and no spook, I’ve got just the design for you. It’s a simple skeleton cookie with a Day of the Dead skull vibe that will be just the thing for little goblins!

Easy Skeleton Cookies for Halloween by Melissa Joy

I gathered inspiration from a few of my favorite cookie peeps (I’m looking at you Make Me Cake Me and Munchkin Munchies!) and came across the perfect decorating sprinkles to create these easy Halloween skeleton cookies. Here’s a brief how-to for you to try!

gingerbread man cutter = skeleton cookie

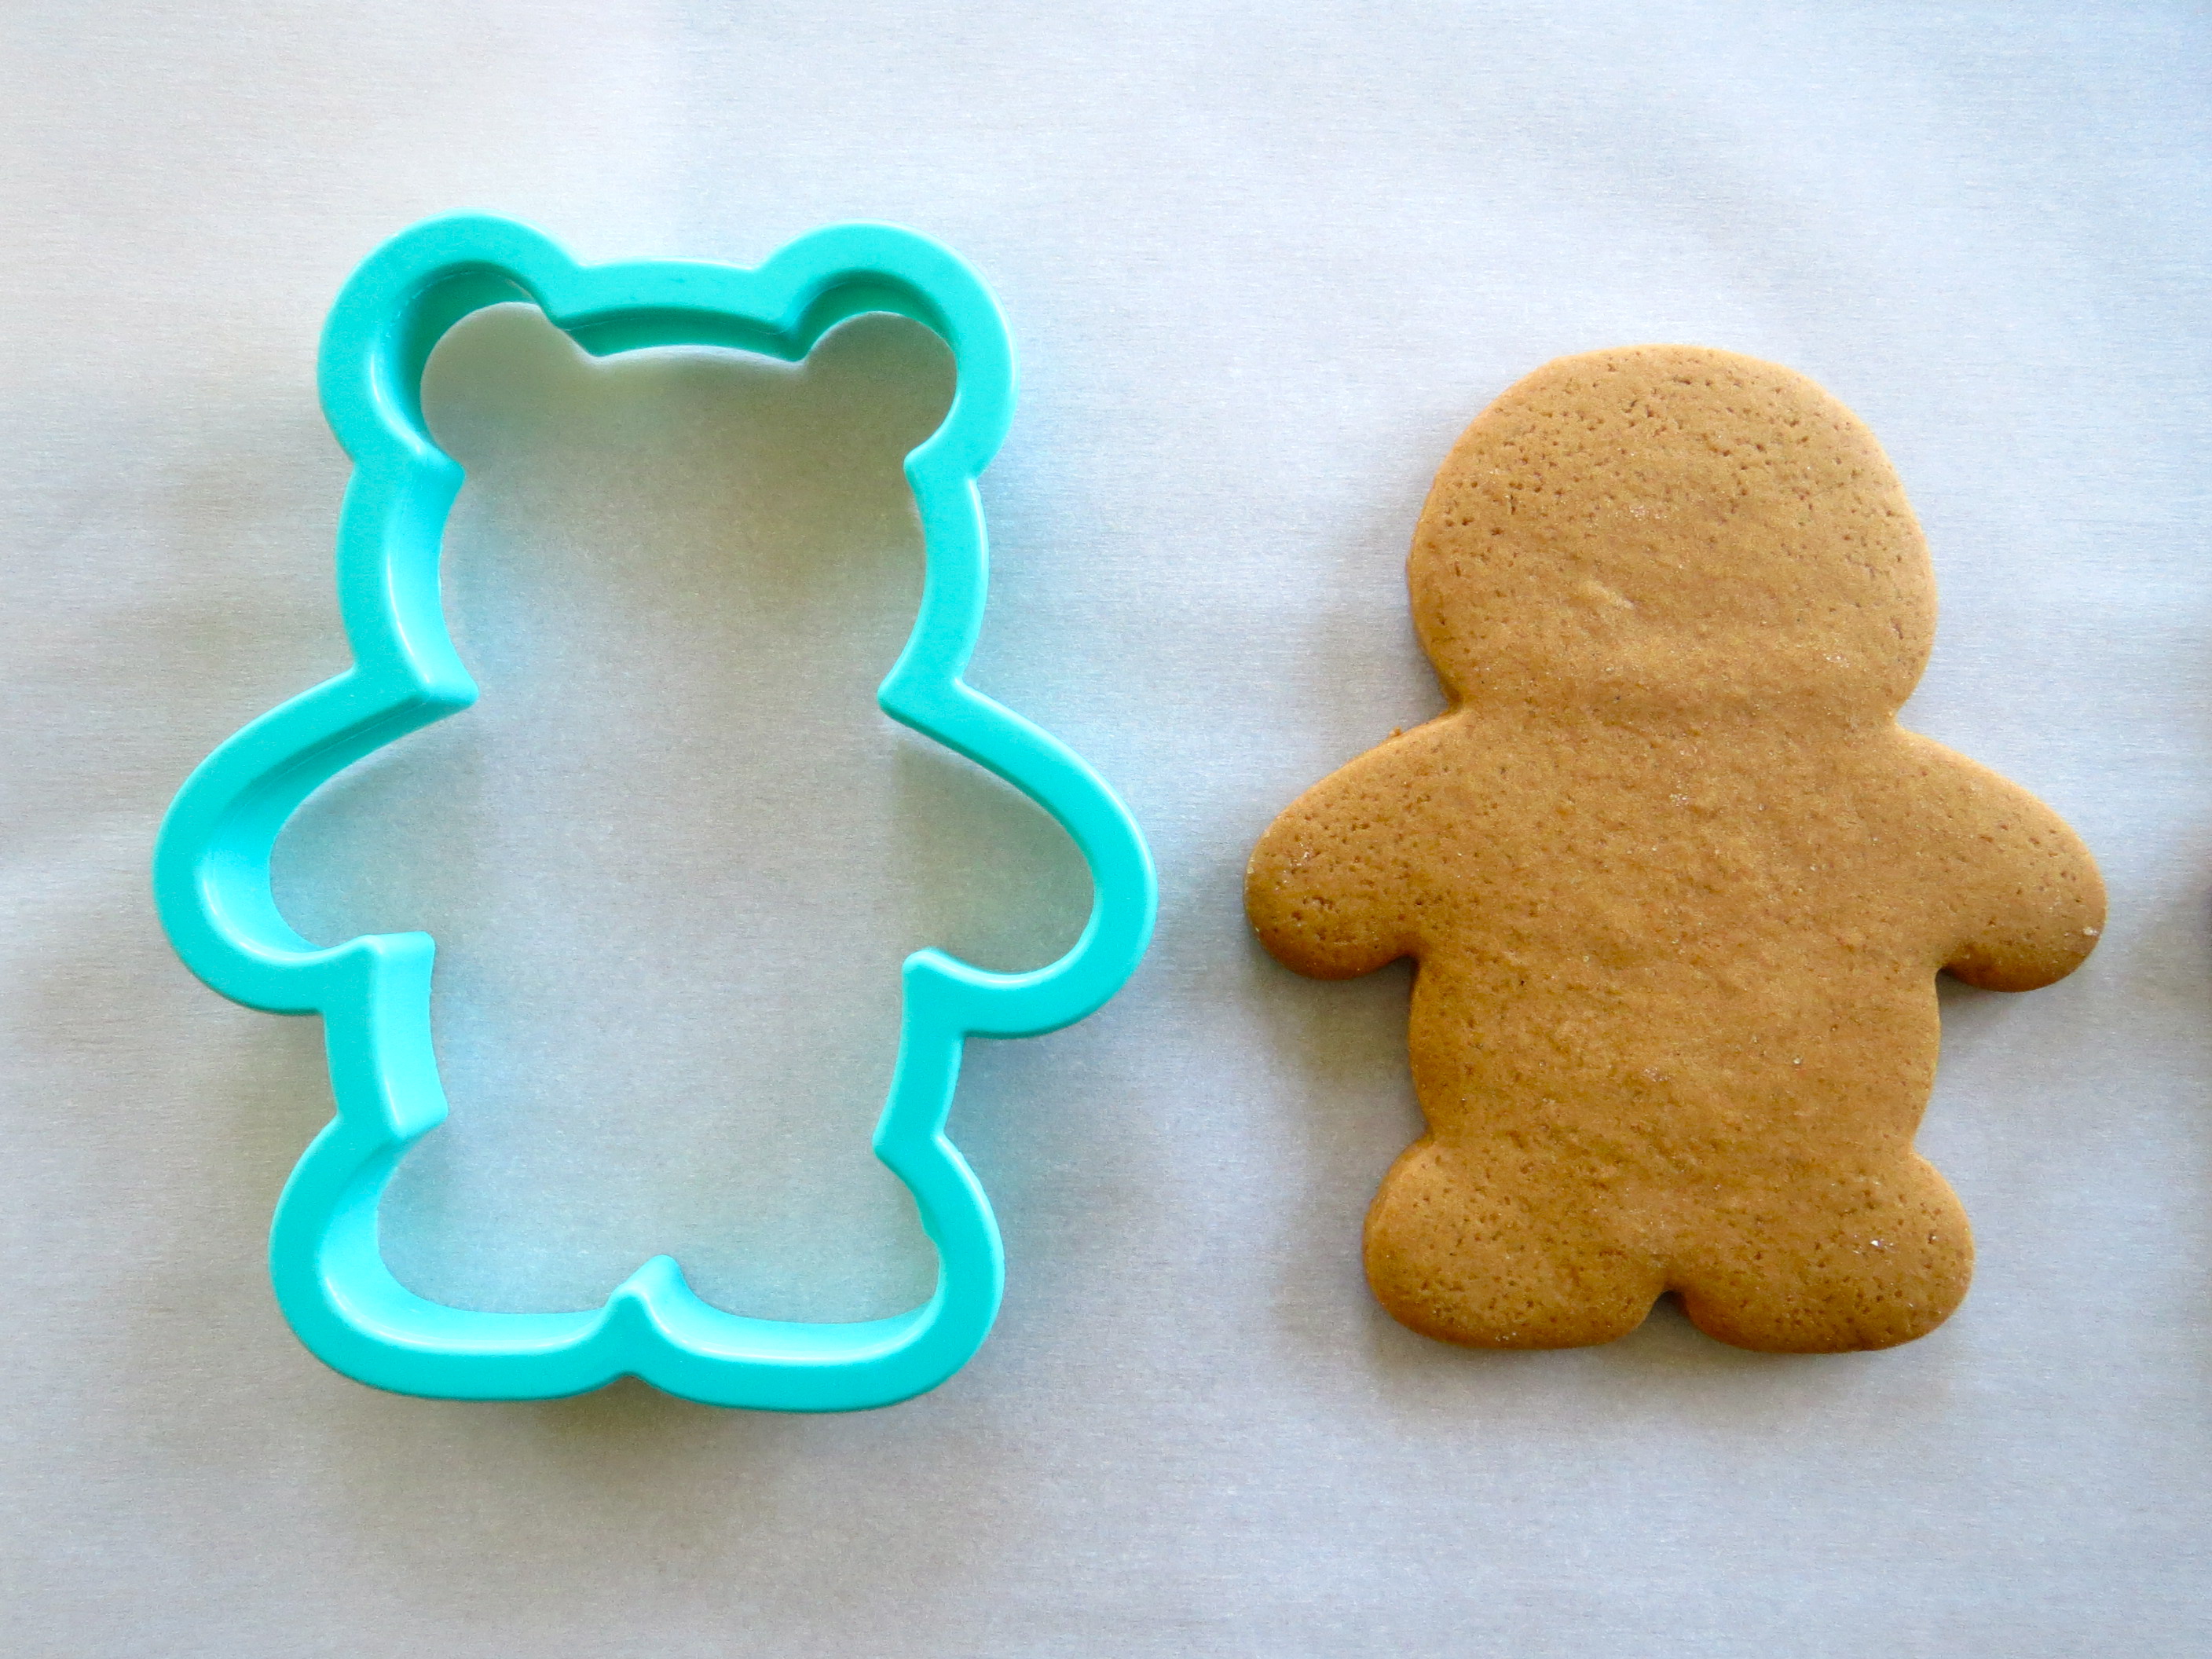
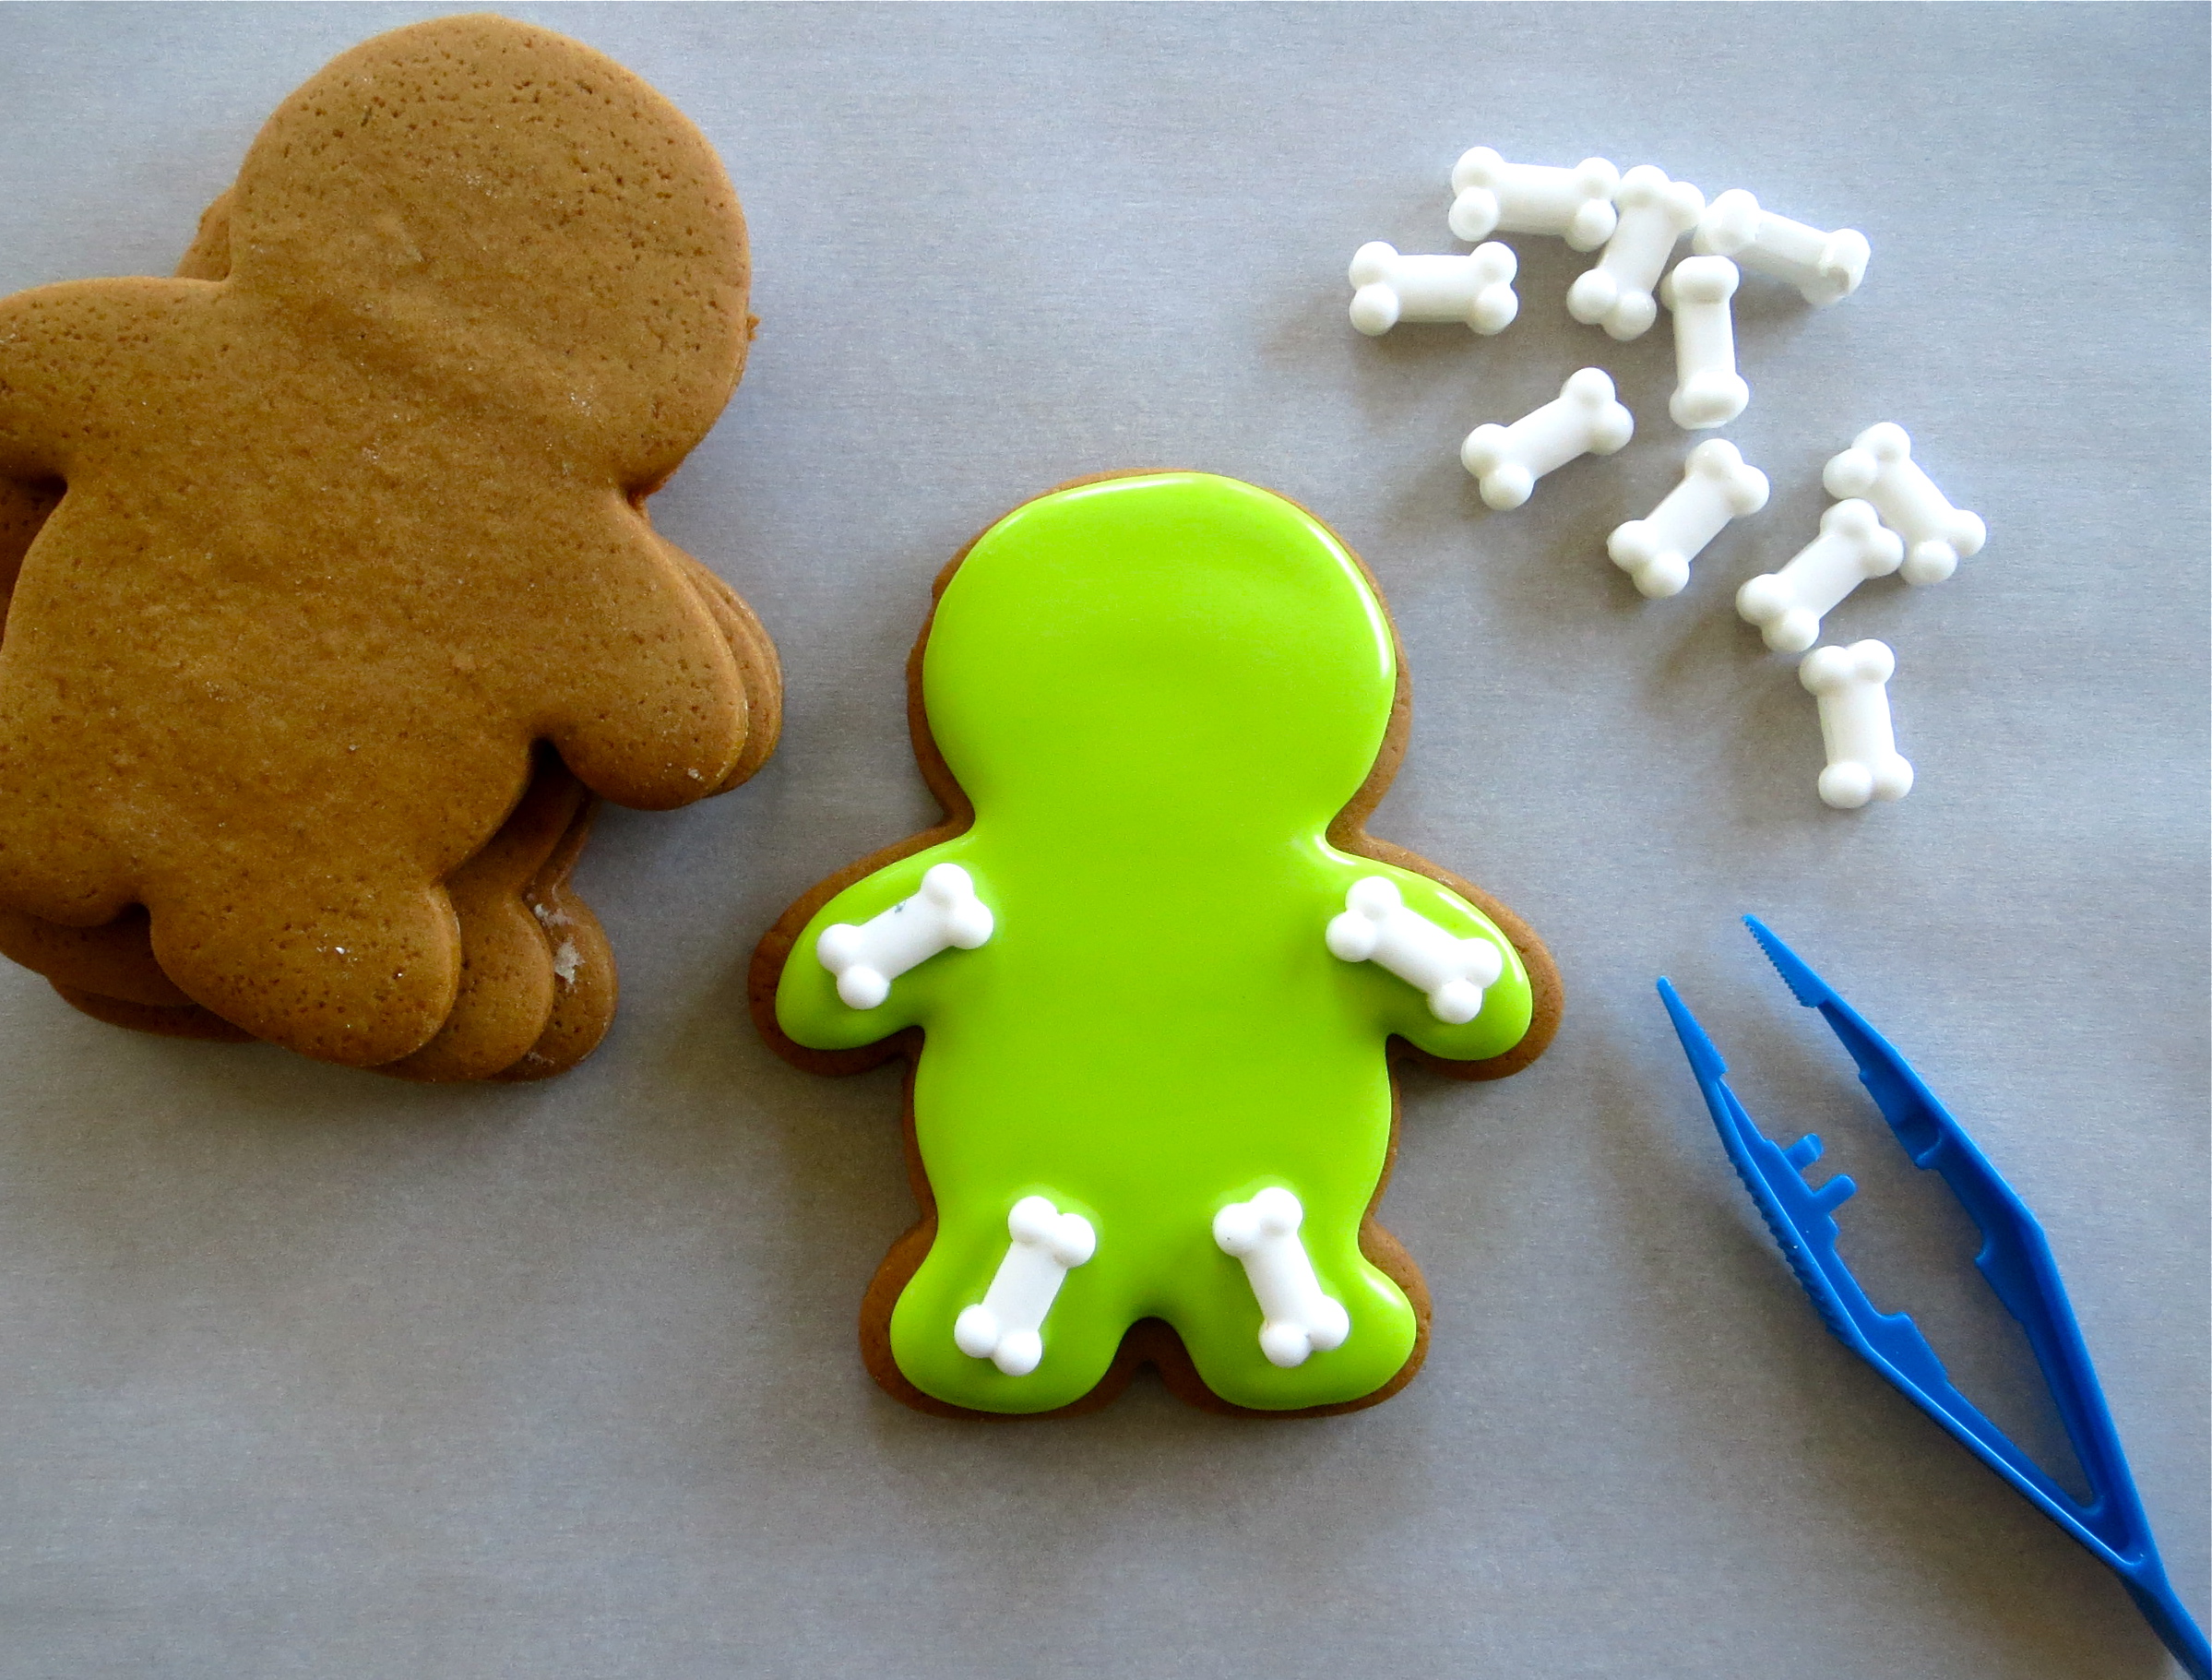
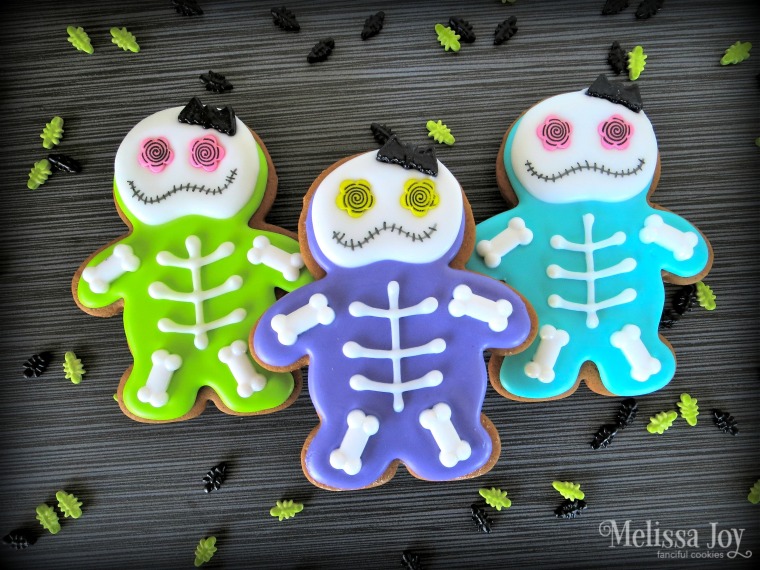
Start with your favorite roll out cookie recipe and a gingerbread man cookie cutter. I loved the general look of this bear cutter, so I trimmed the ears off before baking to make my skeleton shape. It worked like a charm!

skeleton cookie how-to

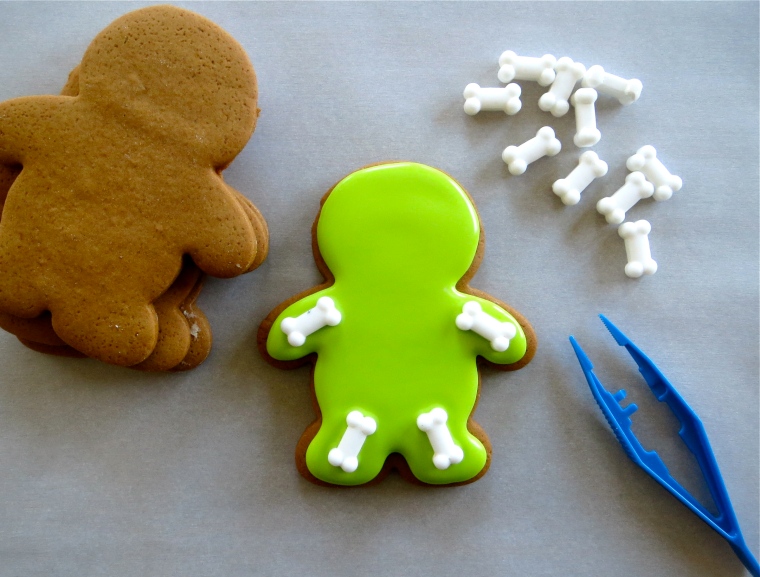
Ice the entire base of the cookie and while it’s still wet, drop bone sprinkles where the limbs would be (these particular candy decorations I found at Target). Let the icing slightly set, about 30 minutes. I use an oscillating fan or small portable heater fan to speed up the drying process.

skeleton cookie how-to

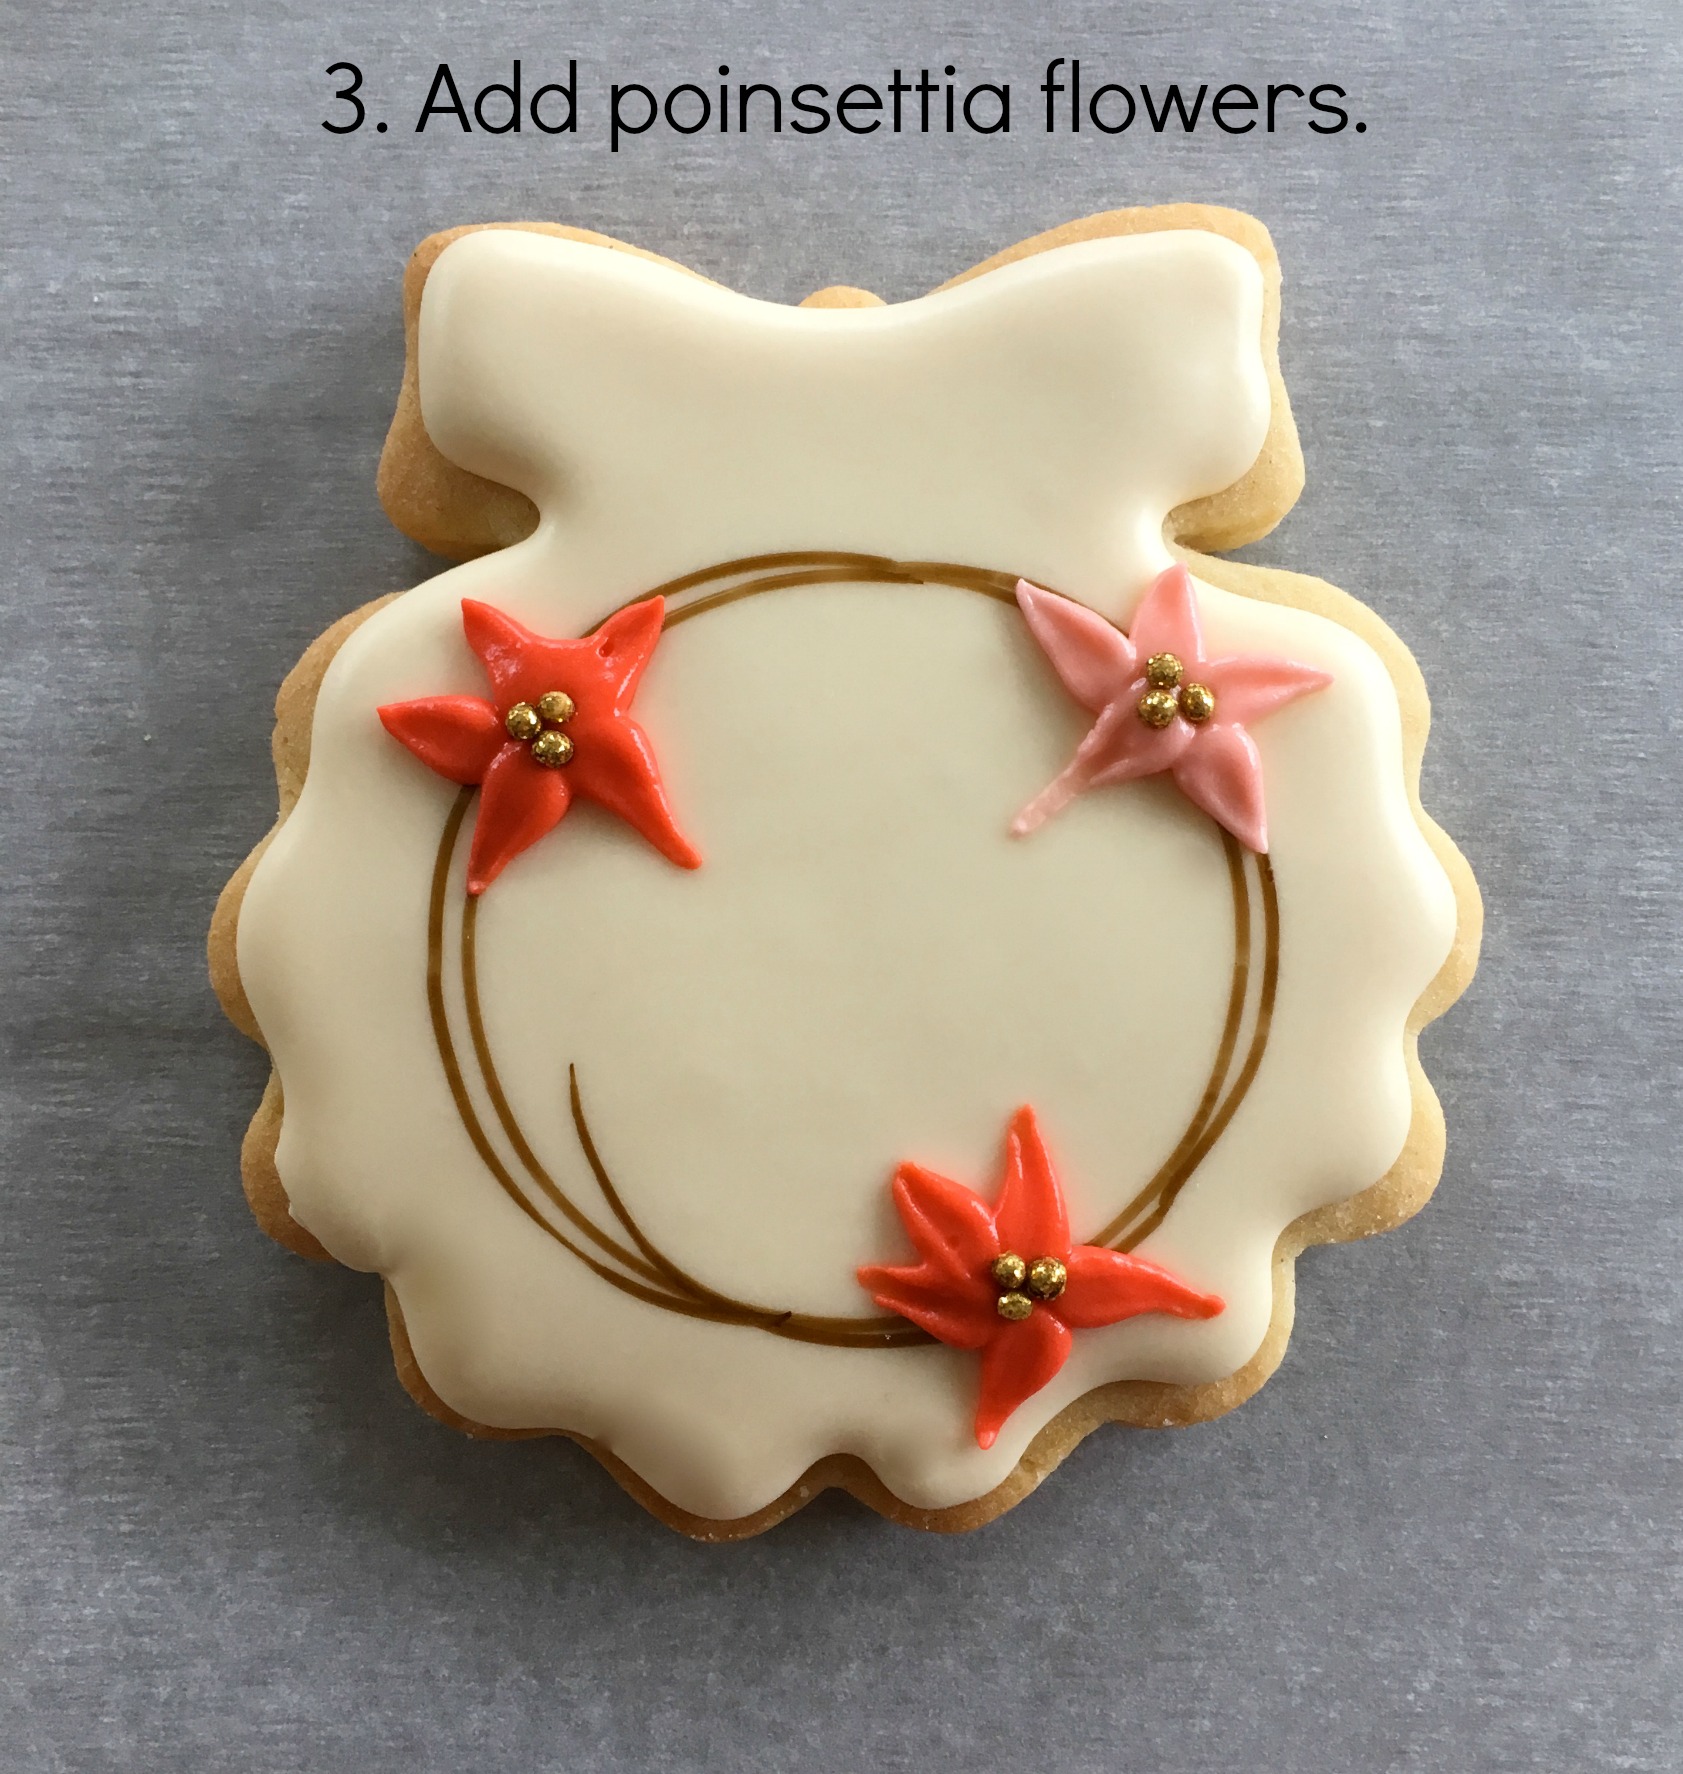
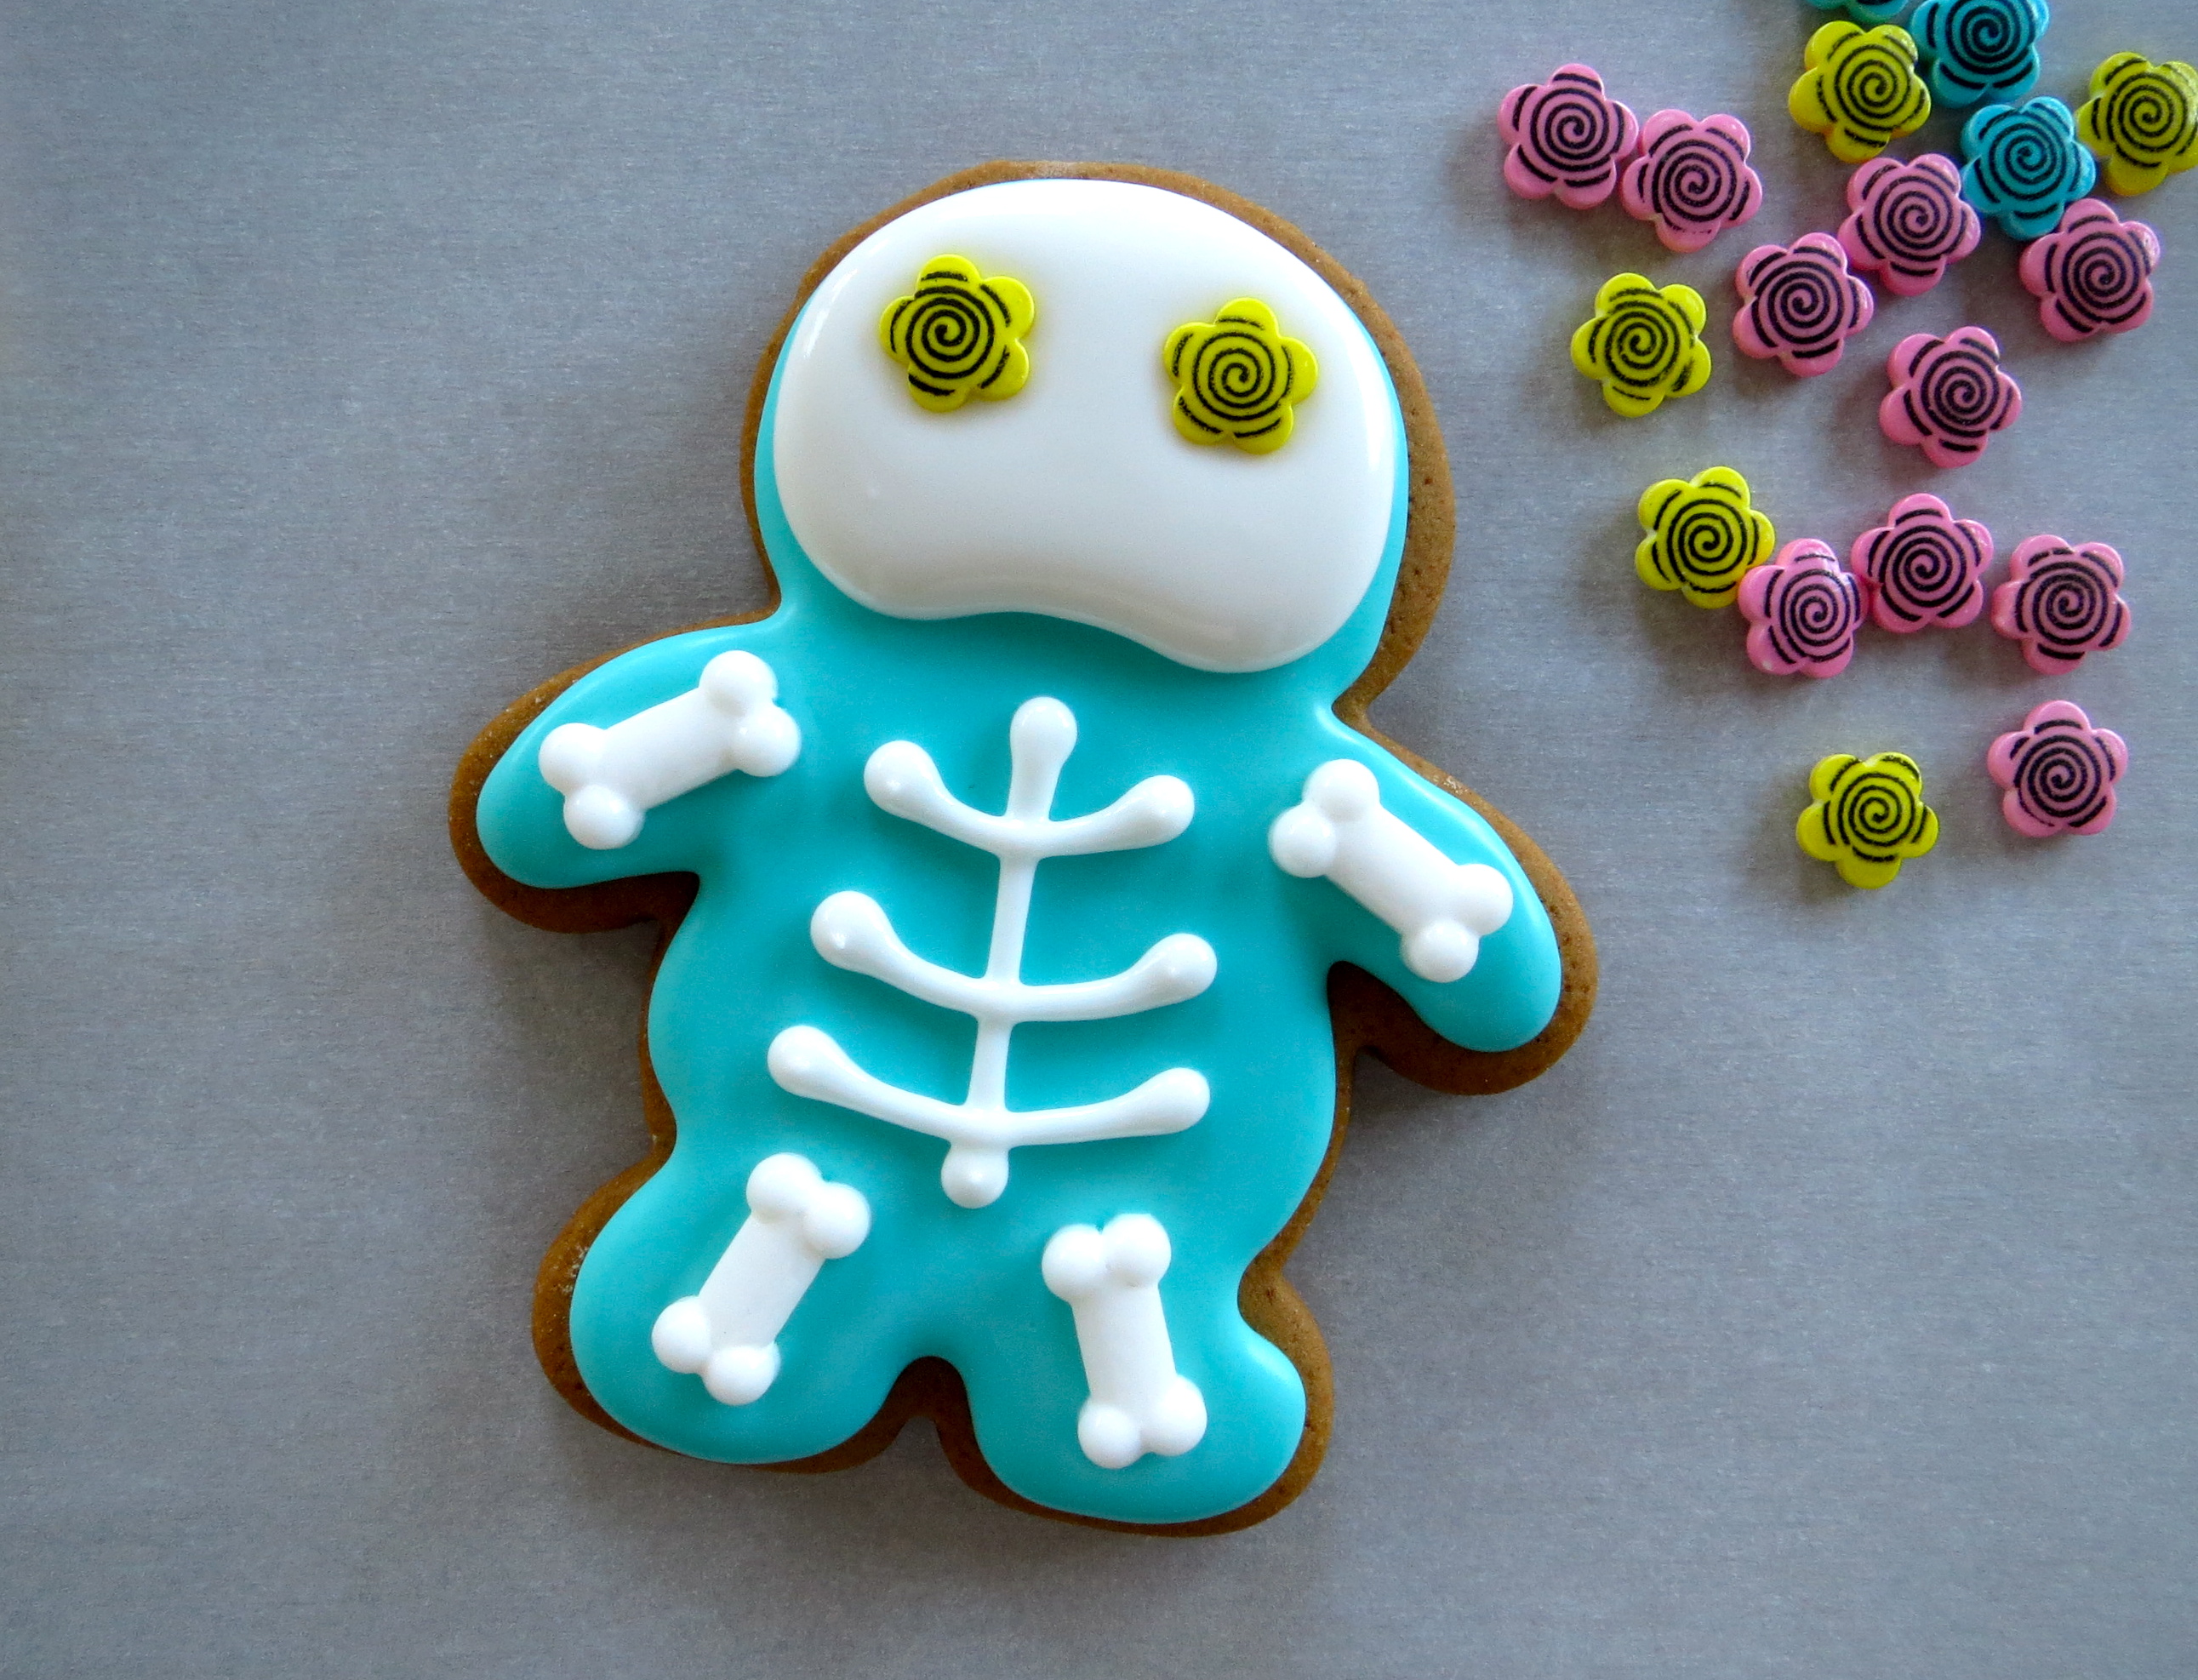
After the base is ready, pipe the ribcage and a skull-like face. Immediately add eye sprinkles in place. I came across these Wilton Tattoo Daisy Sprinkles by chance and knew they would be the perfect detail for my skeleton cookies! They bring a bit of whimsy to the design and make the decorating so easy. Always a bonus in my book! 😉

skeleton cookie how-to

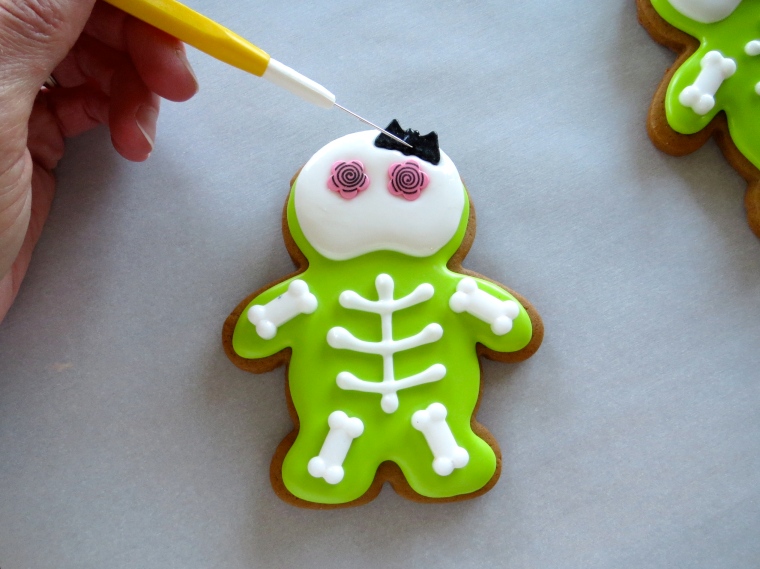
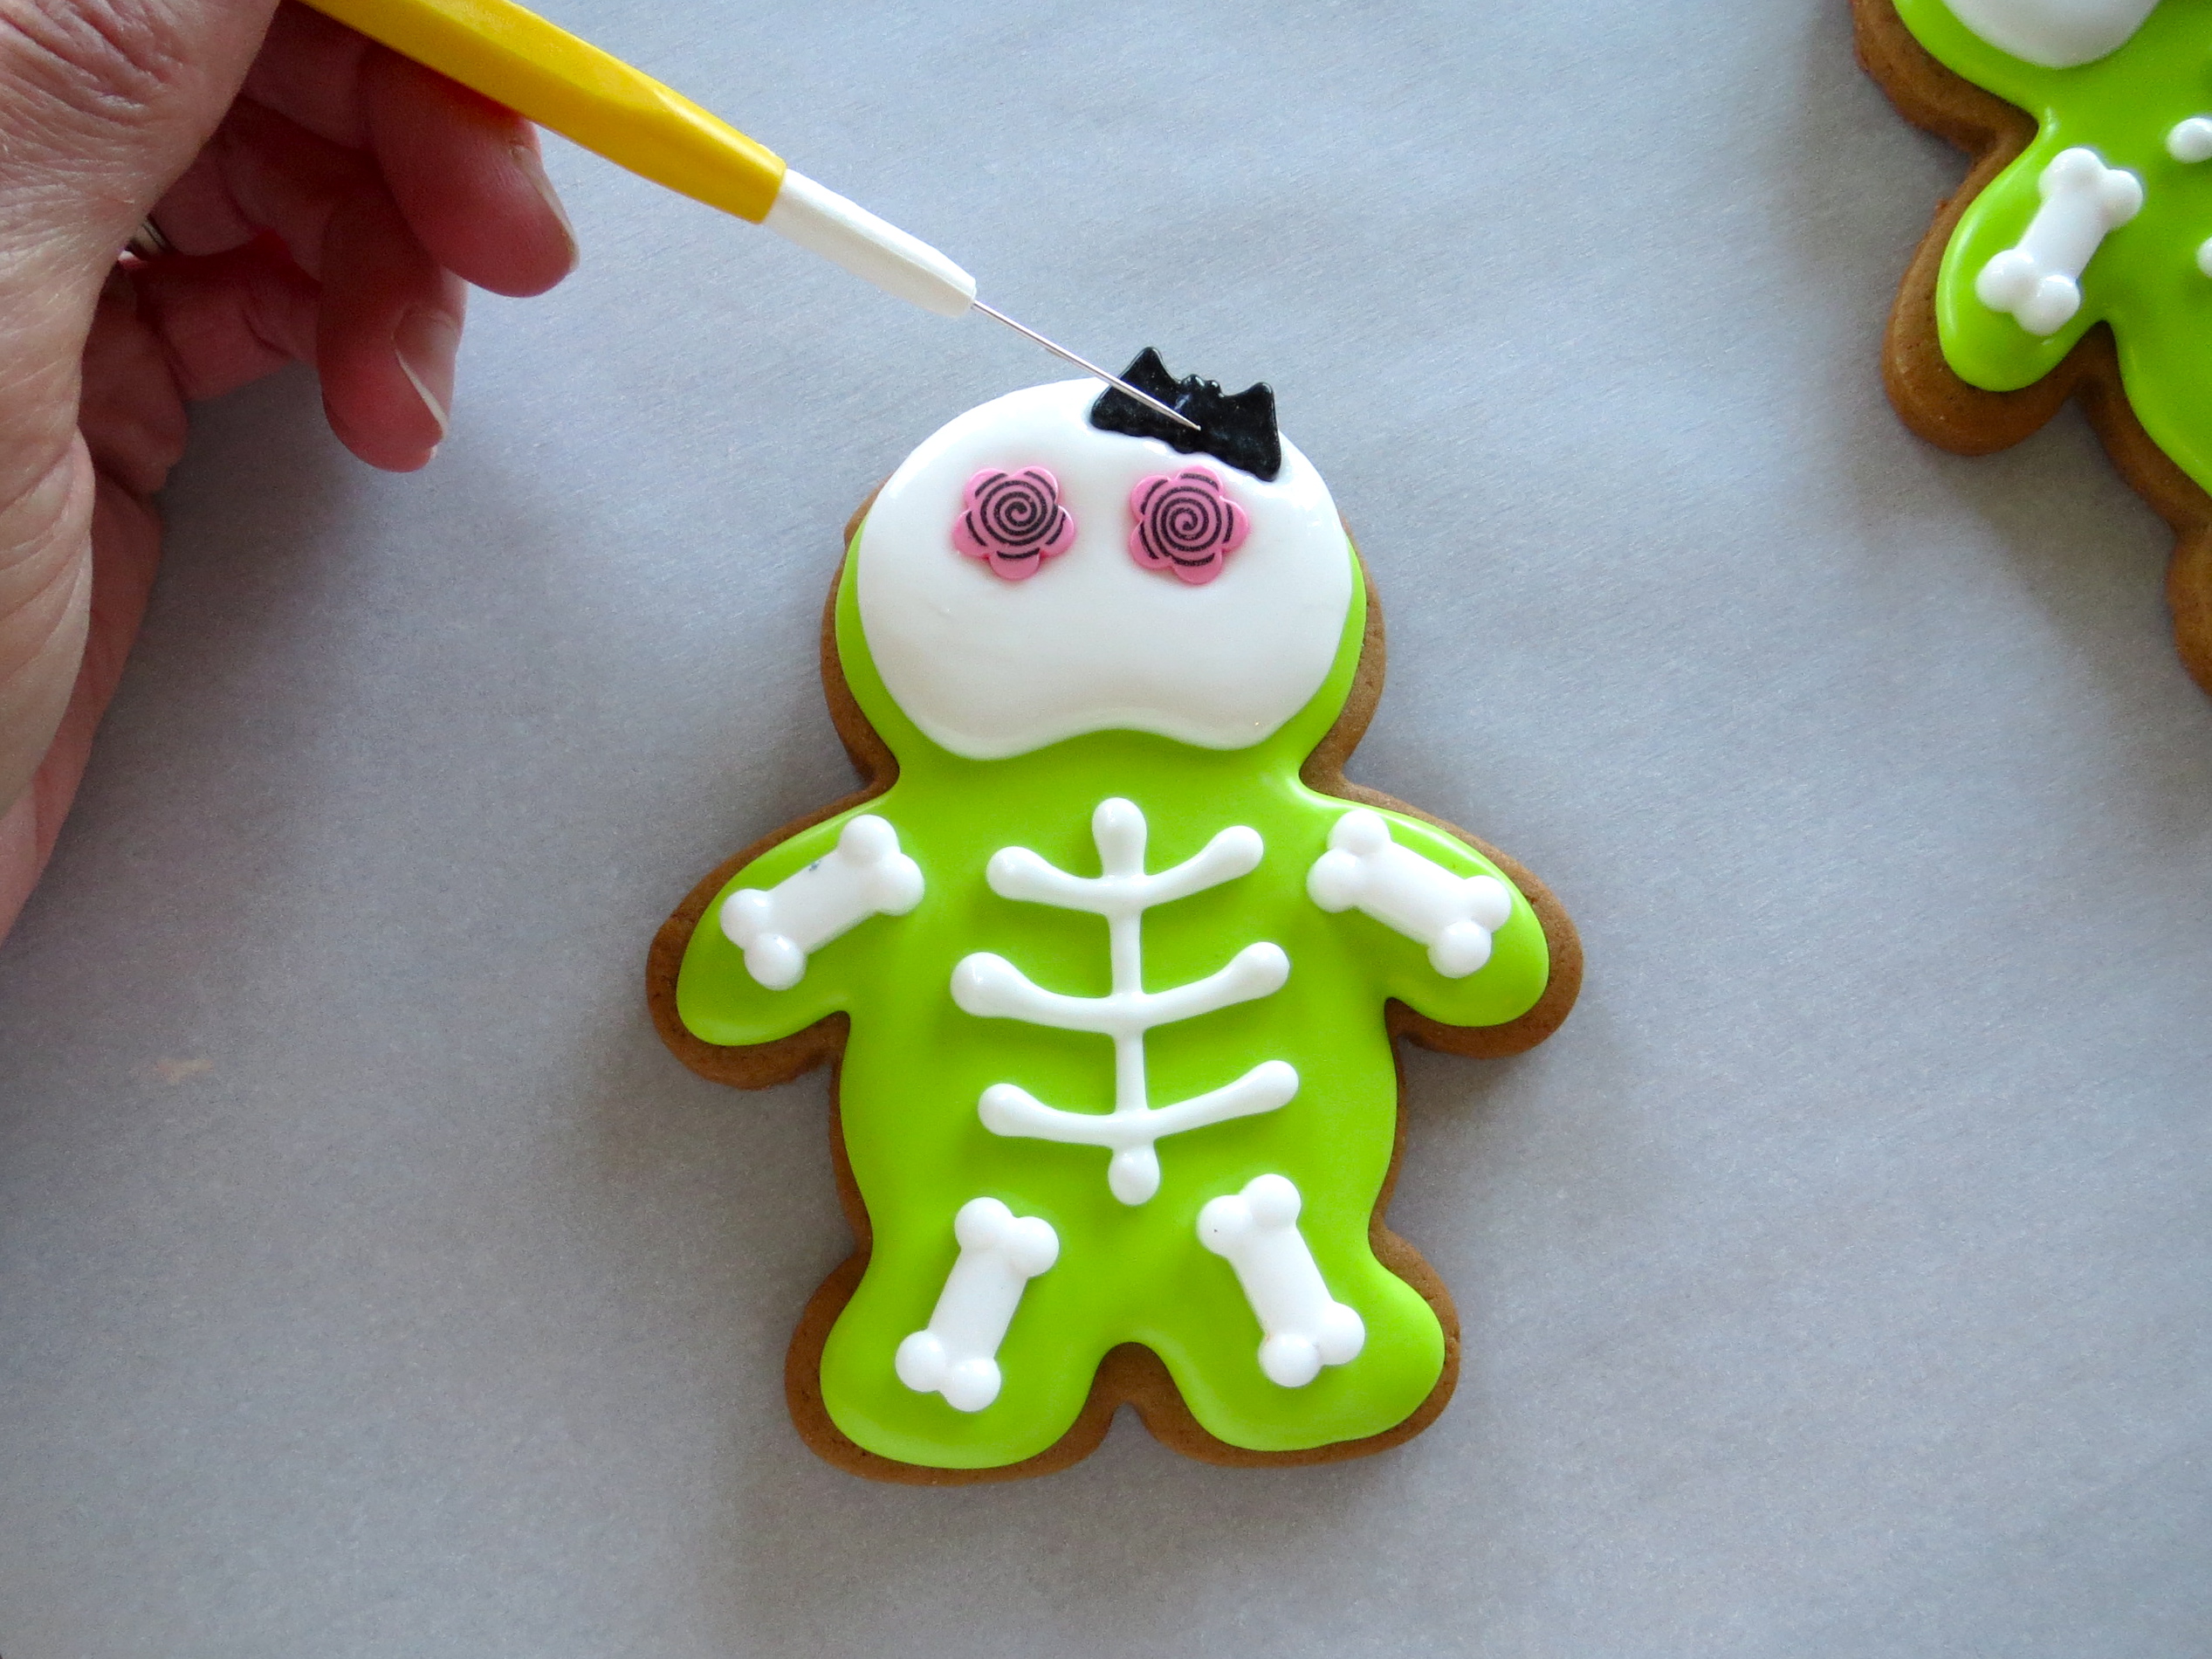
Included in the jar of bone candies I mentioned above were these black bats. I stuck a few to the top of the skulls when the icing was still soft to simulate a batty bow. Just an FYI, they were sort of large, so I had to hold it in place a few extra seconds to get it to stay. Looks sweet though!

Skeleton Cookies by Melissa Joy

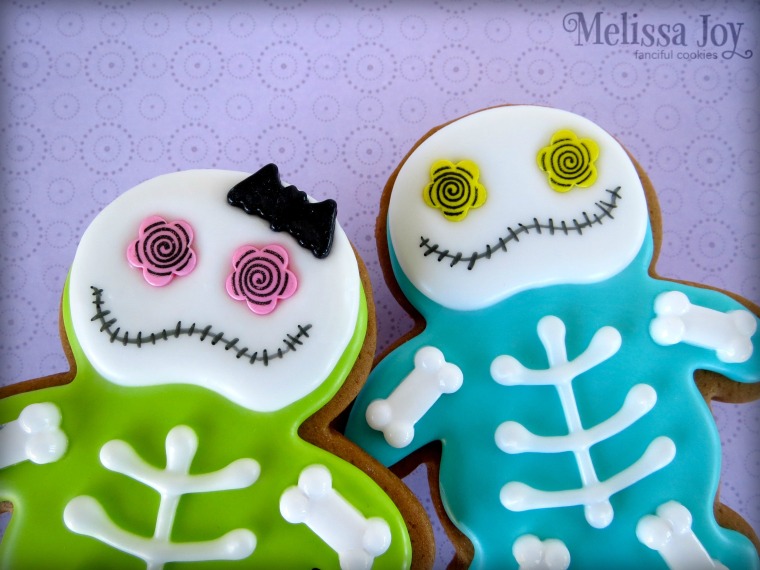
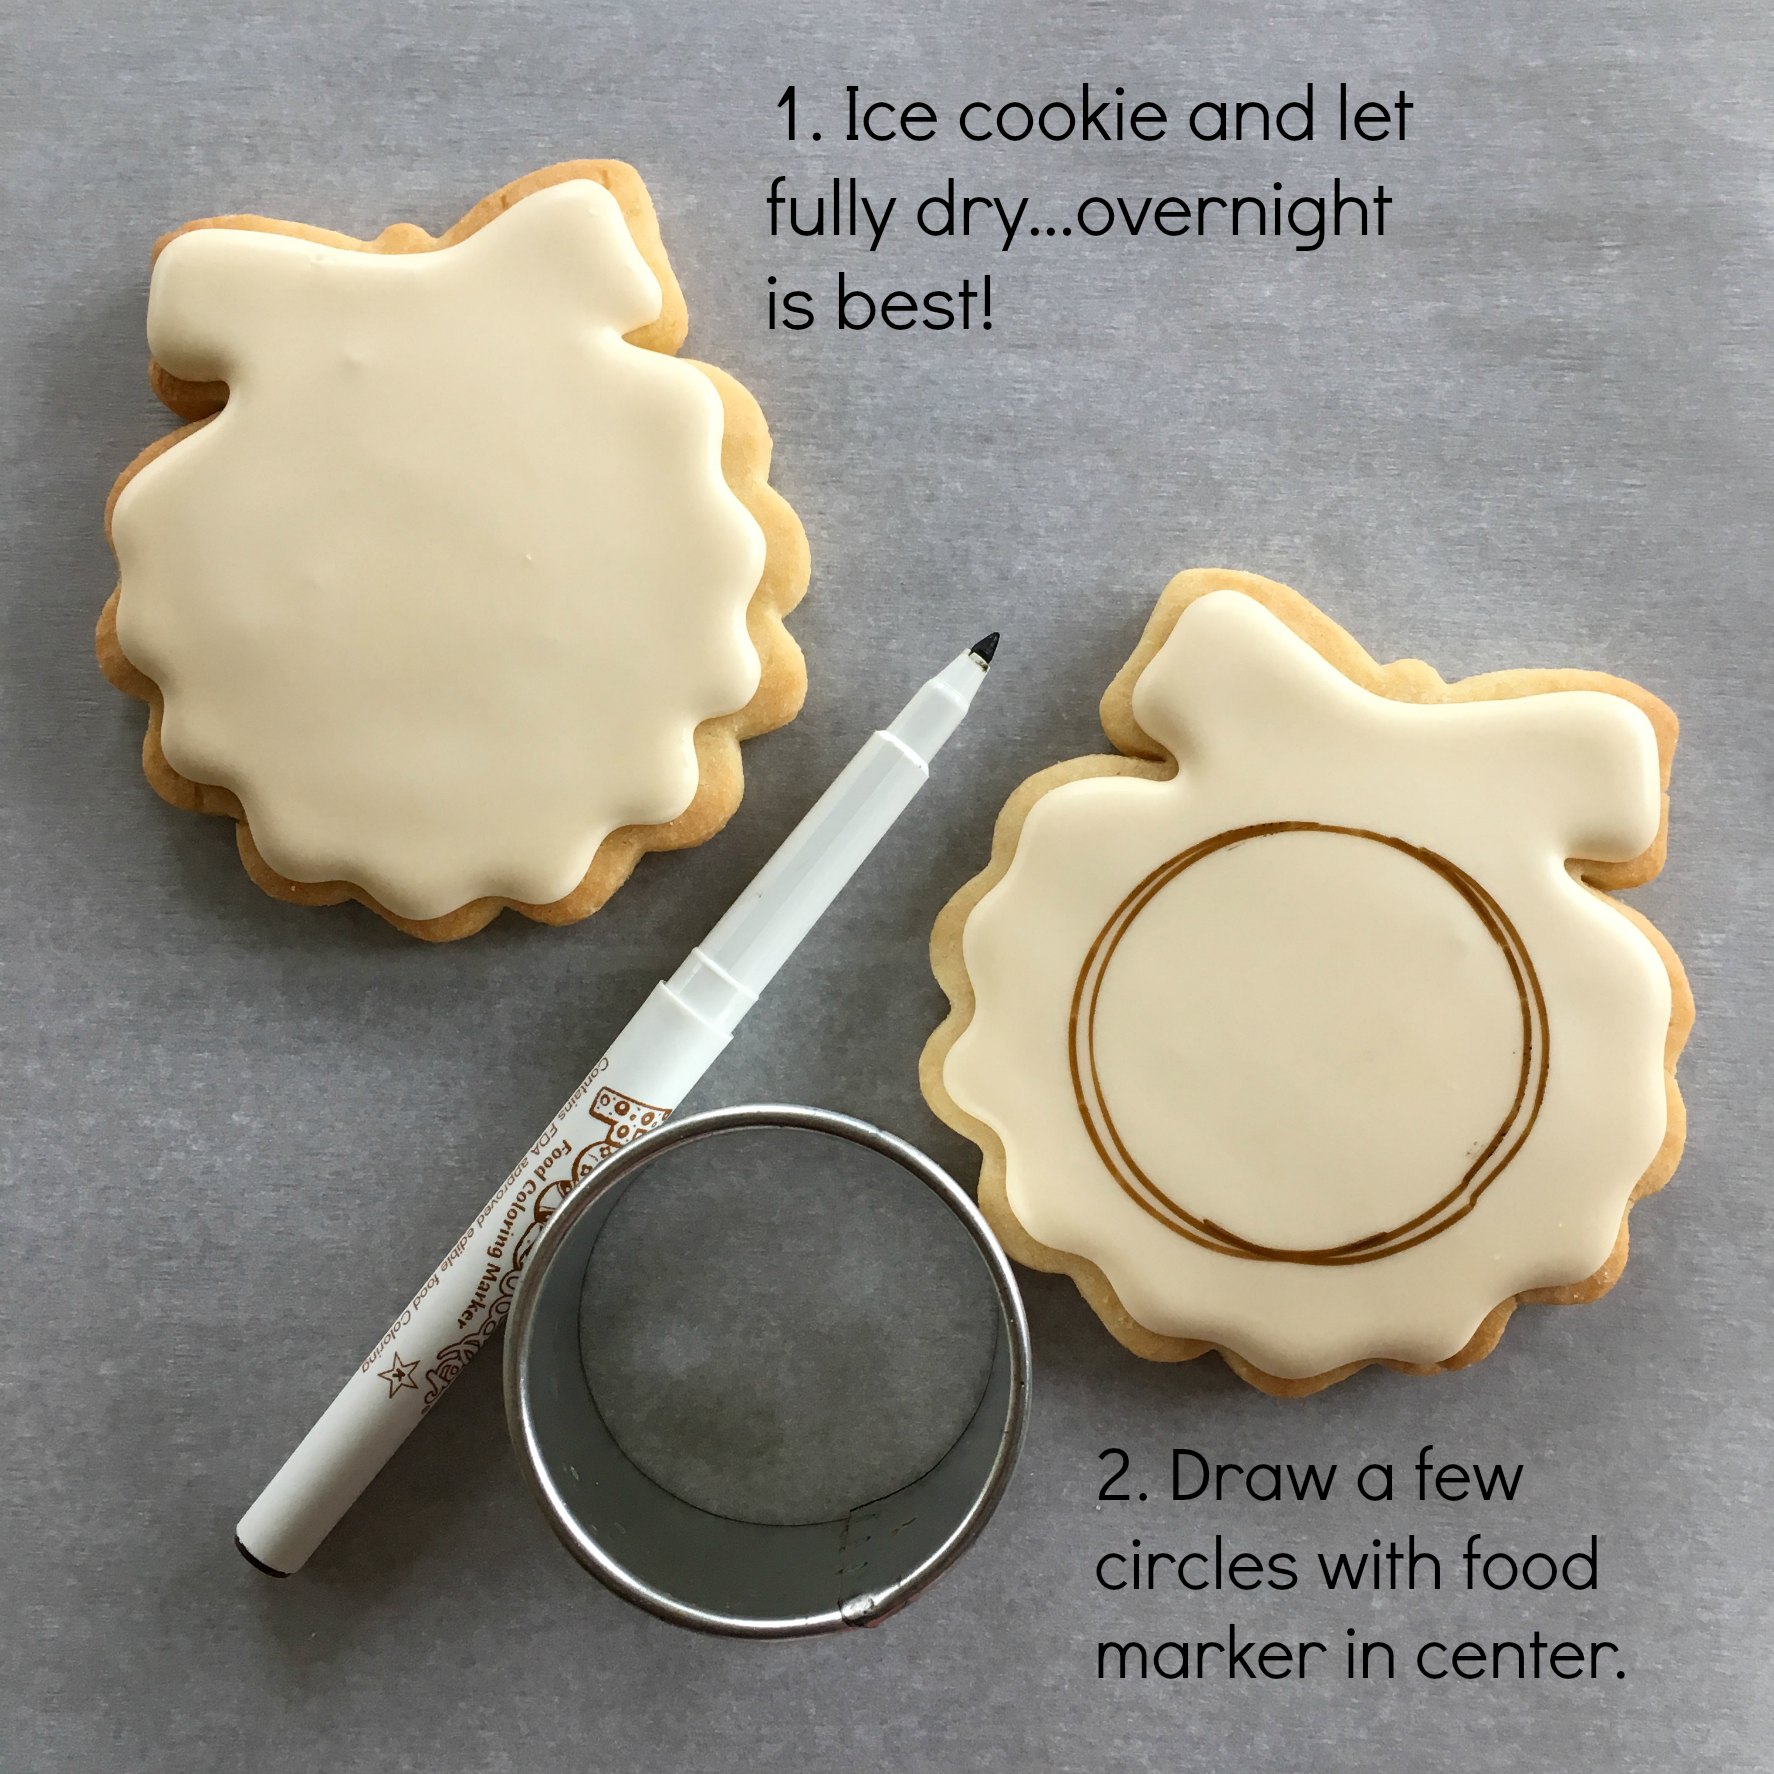
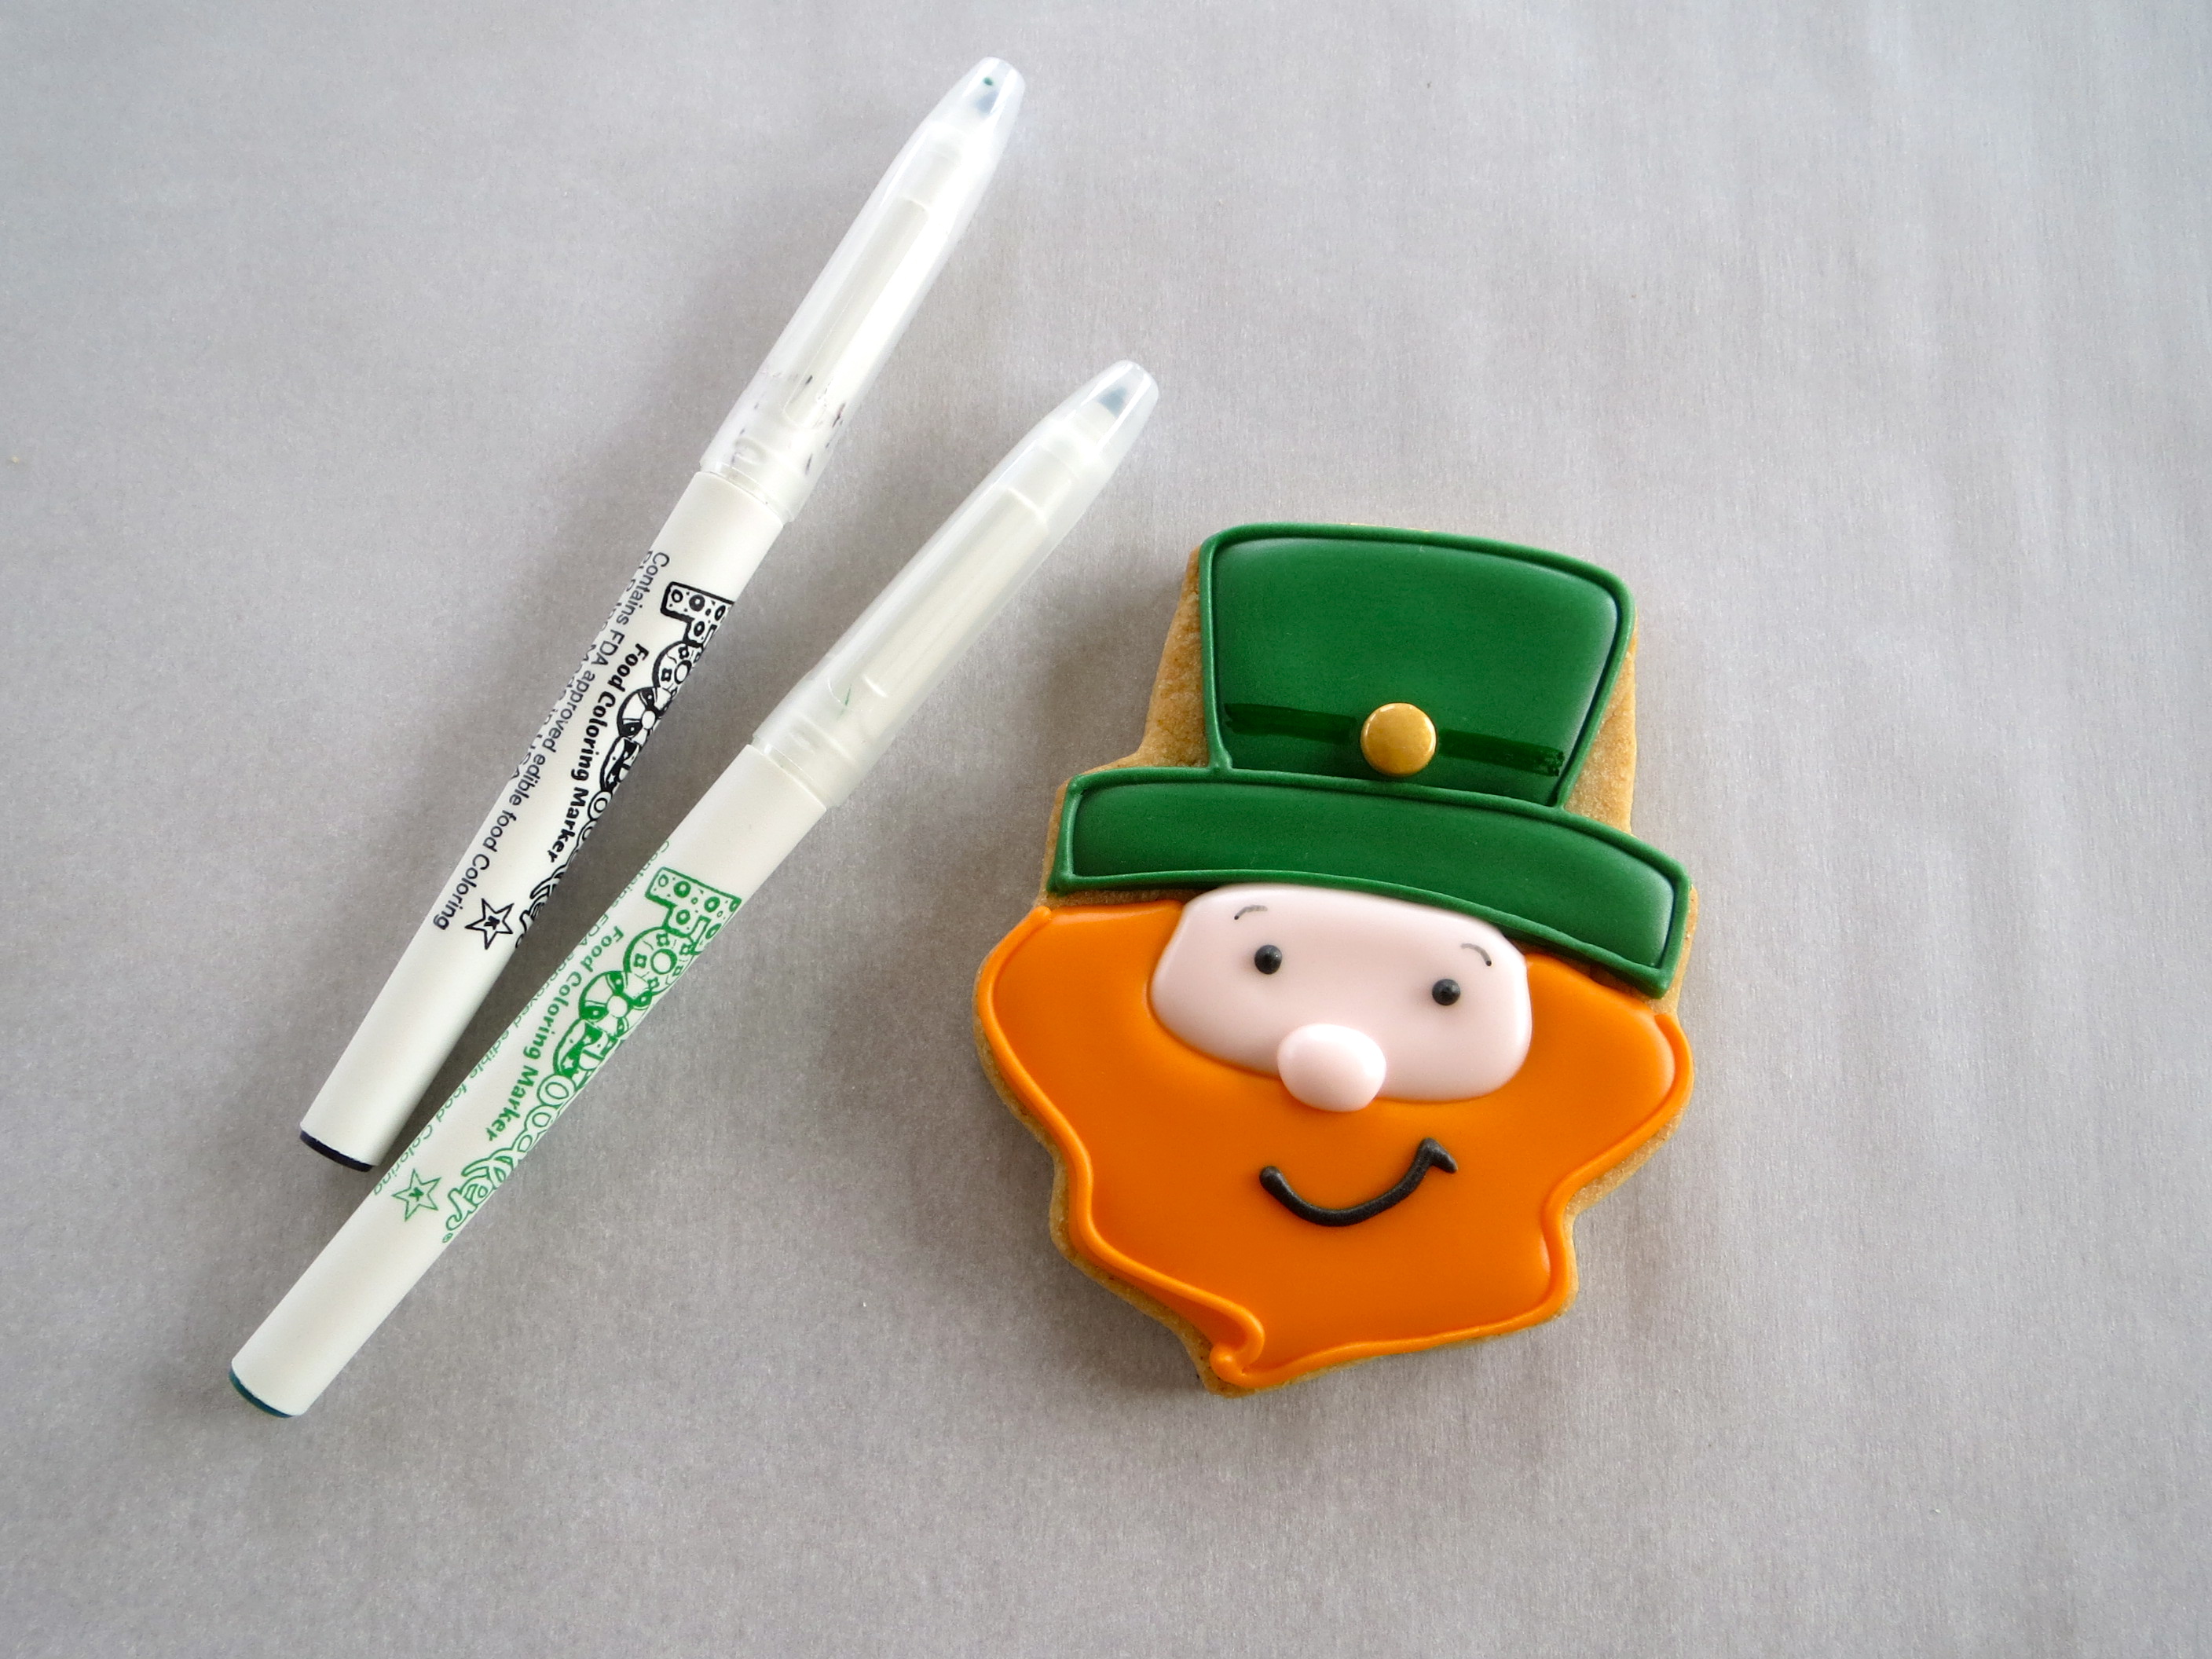
Once the cookies are completely dry*, preferably overnight, finish the skeleton cookies by drawing a big smile with an edible food marker.

*My impatience in waiting to see the end result caused my marker to go through the icing on a few, so really, try and wait. When this occurs there will be marker bleed and frustration and then shame. I hate messing up at the very end because of my restlessness. ARG!

Easy Halloween Skeleton Cookies by Melissa Joy

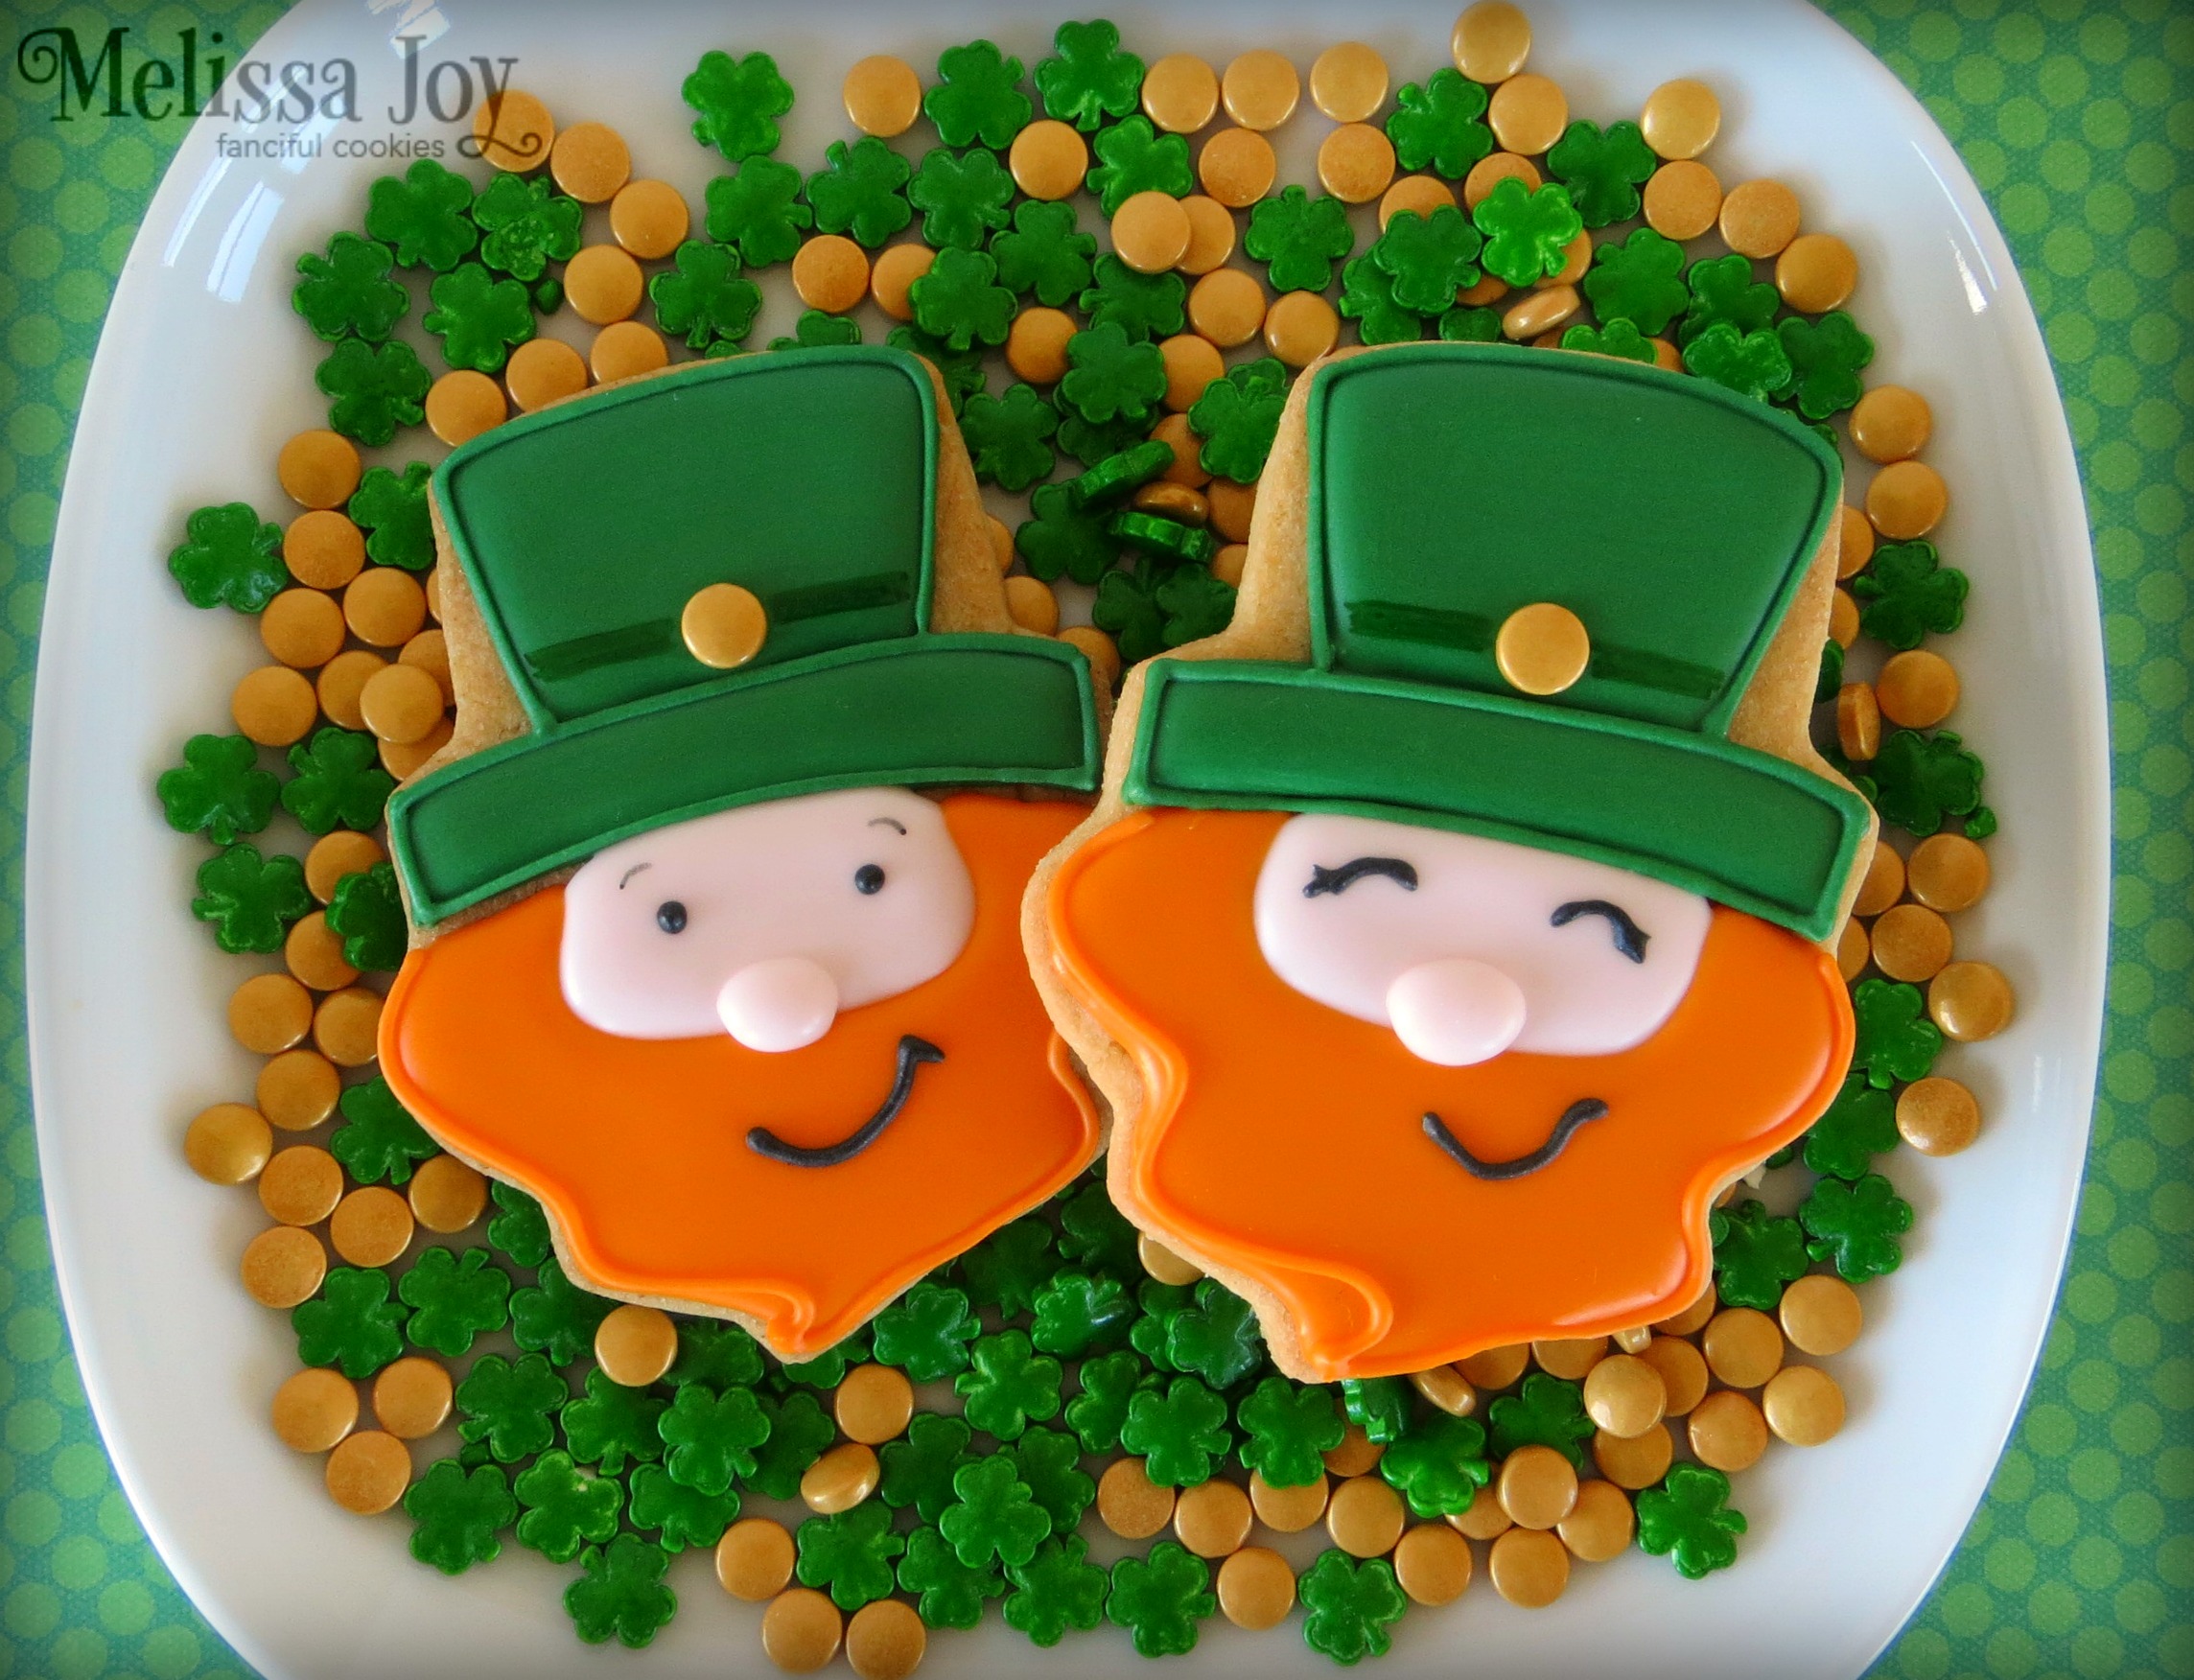
And they’re done! My cute-not-scary easy skeleton cookies for Halloween!

One last note, dear readers…I created these guys for this year’s 4th annual Go Bo! Foundation Bake Sale, held in beautiful Door Co., WI. This cause is so dear to my heart, because it is based on the notion of kindness and was started in honor of a young man wise beyond his mere 13 years on this earth.

Bo Johnson was a boy who’s message to us all was to help one another out, pay it forward, and to always be kind. After his passing from a rare from of leukemia in 2012, the Go Bo! Foundation was created by his awesome mom, Annika. This non-profit helps kids with cancer and their families by assisting them financially, as well donating to organizations dedicated to childhood cancer research.

Thanks to the tireless work of JillFCS and FlourGirl Patissier, many of us have watched this bake sale grow exponentially since the very beginning (last year this mighty, homegrown sale raised $25,000 for the foundation, with the help of cookie artists from all over the world!). I’ve had the honor of meeting Annika and several of Bo’s incredible doctors, and listened them speak so highly of a remarkable boy and his vision. I am truly humbled to be a part of it all. We hear you, Bo, and we our doing our best to carry on your wish! GO BO! ❤

Find more information about the bake sale on the Facebook page, Go Bo! Foundation Bake Sale, and the foundation it supports at www.gobofoundation.org.

Easy Firework Cookies for the 4th!

There is still time left to put together cookie pops before the 4th of July weekend! So fun. So easy. So festive! I posted a tiny tutorial on my Facebook page yesterday, but wanted to give you more details about it. Follow along!

Easy firework cookies by Melissa Joy

I used a pointy scalloped cookie cutter (is that what you’d call it?) for these, but any round or flower cookie cutter could work. Ice your favorite baked cookies in white royal icing and let dry fully…overnight is best.

1. With food writers, draw slightly curved lines in blue and red, radiating from the center. *I chose the Americolor brand this time.

2. Create the same curved lines with red and blue icing in between your drawn lines. *I used snack size ziplocs to pipe this icing. Just cut off the tiniest part of the corner and you’re good to go!

3. Grab different sizes of star sprinkles. Place the largest star you have in the middle and accent with smaller stars around the rest of the cookie, adhering the stars with a dot of RI.

4. Add a few tiny dots of red and blue RI in the spots that need a little more detail.

5. The firework cookies are fine decorated just as they are, but if you’ve snagged something like these adorable stars and stripes straws (darn you, Target dollar bin), continue to this next step! Squirt a blob of icing on the back of your pretty cookies. Flatten one end of the straw first (I don’t know if this makes a difference in getting the straw to stick, but for some reason, I just do it.) and squish the straw into the icing. Let dry for several hours until hardened.

Easy Firework Cookie Pops -by Melissa Joy Cookies

Easy firework cookie pops done and ready to enjoy!

These are so simple. No doubt the kids can decorate them for you. Keeping them busy will give you more time to get ready for all your other 4th of July rituals!

Have a wonderful Independence Day weekend everyone!

Easy Flower Cookie Platter

Ever since I created and posted this flower cookie platter, I’ve had lots questions regarding it. It’s so easy, you guys, and the design came to me at the last minute. I don’t know how or why this works, but in this case it did! Due to all of your inquiries (thanks for asking!), I wrote up a tutorial to hopefully answer your questions.

Simple Flower Cookie Platter-Teacher Appreciation by Melissa Joy Cookies

I initially created this set for teacher appreciation week, but it could be easily adapted to fulfill any gathering of hungry cookie monsters. It’s a quick design capable of feeding a lot of people, and when you’re pressed for time to create something lovely, this easy flower platter can be the perfect solution!

Flower Cookie Platter for Retirement Party by Melissa Joy

The most frequently asked question I received was what cookie cutter did I used for the petals. They are pictured below: a large, 3.25 inch tear drop and a mini, 2 inch tear drop. The platter’s center cookies were made with a 1.5 inch and 2 inch scalloped round cutter (but any round would do), and a few accent cookies created with a 3 inch leaf cutter.

Flower Cookie Cutters Needed

I knew that I wanted the design to have an ombré effect, so I started with 3/4 cup of royal icing in a dark shade and flooded it on about 10 mini tear drop cookies. Half of the mini iced cookies I sprinkled with sanding sugar and half I left without.

After the mini cookies were complete, I added a 1/4 cup white RI to the color I had left in my pastry bag to get a lighter shade, and decorated 8 to 10 of the large tear drop cookies. Again, half of the large cookies I sprinkled with sanding sugar and half I detailed using a simple swirl (*save a bit of your darkest icing for the swirl!). I continued with a white RI addition to the remaining color after each group of 8 to 10 cookies, in order to create that ombré look once the cookie platter was assembled.

tear drop cookies

I also made the flower’s center cookies in yellow, as well as a few green leaves for accents using sanding sugar, nonpareils and a simple swirl, to add a variety of textures.

leaf and center cookies

Let the whole set of decorated cookies dry overnight.

When ready, I arranged the individual cookies starting with the outside petals first and worked my way in towards the center. It takes a bit of patience, stacking and messing around with the cookies to get them just right, but you will be so happy with the result!

Flower Cookie platter - Retirement Party by Melissa Joy

For this particular platter, I used approximately 60 cookies. It’s just as easy to arrange a flower set on two smaller plates using 30 cookies each, but I guess it just depends on what you need. I also added a 5 inch plaque cookie to these sets, because I like to bust out Mabel, my kopykake projector, and get some piping practice in!

Teacher Appreciation Flower Cookie Platter by Melissa Joy

This flower cookie platter is so versatile! It could be used for lots of occasions…baby showers, wedding showers, family reunions…any group would love to be on the receiving end, don’t you think?

If you have any more questions or there is something I’ve missed, feel free to ask in the comment section below.

Happy baking!

Shirt and Necktie Cookies for Father’s Day

Nothing like a little last minute idea for Father’s Day cookies! If it’s a bit too late to create your own, save these guys for next year (you can pin it here!)….or make a paper version. Cards like these would be just as cute, but not quite as delicious.

Father's Day Tie Cookies by Melissa Joy Cookies

This cookie concept came from another Father’s Day cookie design, these shirt and tie cookies, I made a while back. Because I still love them, I wanted to give ’em an update and get the kids involved. A bit of leftover dough this week was all I needed to make a nice set for good ol’ Dad.

Father's Day Shirt and Tie Cookies

For this new shirt and necktie cookie version, I used a small, 3 x 1 inch tie cutter and a large, 3 x 4.5 inch rectangle cutter. Once the cookies were baked and cooled, I flooded them with white royal icing and let them dry overnight.

shirt and ties-white

Depending on how many kids you’ve got and how into crafting they are, this next decorating step can take a total of about 5 minutes. Hand them bunch of food markers and let them color the tiny tie cookies to their heart’s content.

kiddies in action

They could draw details on the shirt as well, but they will probably want to get back to playing video games outside. It is summer break, after all…

Father's Day Shirt and Tie Cookie How-To by Melissa Joy

The number of shirt and ties you make is up to you. Arrange them as you see fit and they are ready for giving!

Father's Day Shirt & Tie Cookies by Melissa Joy

Have a relaxing Father’s Day, Daddies! May the only shirt and tie you have to see this Sunday, are the ones you can dunk in your coffee and eat. ❤

Tie Cookies for Father's Day

Football and Baseball Valentine Cookies

It’s #teamallboy over here, so sometimes the cutesy valentines don’t cut it. By setting aside the pale pink icing for a minute or two, I’ve come up with a sports themed valentine set for those athletic kiddos and the sweet sayings to match!

Sports Valentine Collage

Here is a quick rundown on how to make these football and baseball valentine cookies, if you’d like to create some for your little sport!

For the football valentine, I started with a large, 4 inch heart cookie. Using a football cutter as a guide, I traced its shape onto my cookie at two different angles.

IMG_0496

Next pipe over the marked lines with a thick, brown icing. Flood the footballs with a looser consistency of brown, waiting a bit between the two, so the icing will stay segmented.

IMG_0500 IMG_0502

Once the icing has dried, add stitching details. Make a line down the center in white and pipe little hearts. I couldn’t decide which I liked better, only one heart in red or the lot of them, so I made cookies using each technique.

IMG_0508IMG_0507

Football valentine cookies…touchdown!

football valentine cookies-You're a Catch, Valentine!-by melissa joy cookies

The other football themed valentine cookie was made with the same large, heart shape. I don’t have a breakdown of photos showing how I created them (my bad), but they are pretty self-explanatory.

Start with a green base coat and let set. Outline the heart using the same green icing.  Pipe your “plays”, making sure to add “XOXO” and hearts in the correct positions. Next draw directional arrows with an edible marker. I used the FooDoodler brand for these because they have a nice fine tip.

Football Valentine by Melissa Joy CookiesFootball Valentine by Melissa Joy Cookies

Another football valentine cookie…score!

Football Valentine Cookie-I'm making a play for you, Valentine!-By Melissa Joy Cookies

And finally, a baseball valentine cookie. I’ve been saving this idea since last year and it couldn’t be easier!

Ice a round cookie in white. Once it is fully dry, make curved lines using a red FooDoodler. The lines will act as a guide for the heart shaped stitching. Remember that a stiffer icing for details will hold its shape better, especially for these tiny hearts.

Baseball Valentine Cookie How To

Baseball valentine cookies…home run!

Baseball Valentine Cookies-You're an All-Star, Valentine!-by Melissa Joy Cookies

My plan now is to have my dear, sweet husband create printable bag toppers to go with these sporty valentine cookies, which will make them perfect for classroom treats. Let’s talk him into that so I can share with you here, shall we? 😉

Valentine cookies for the sports lover…it’s definitely a WIN!

(This post linked to Kitchen Fun with My 3 Sons)

Proclaim Your Love with Cookie Prose!

If you’ve been following my blog, you know that I love to come up with cookie games. It all started with these Valentine domino cookies, which led to several cookie tic-tac-toe sets in various themes (find them all using the search on my “about” page). Oh, I haven’t abandoned the joy of my tic-tac-toes, but I wanted to come up with something different this Valentine’s Day. It’s such fun to give cookies that require a bit of play!

Cookie Tiles for Valentine's Day by Melissa Joy

This year I created cookie word tiles for my little Valentines so they could make cookie poetry…and then eat them, of course.

Cookie Poetry for Valentine's Day by Melissa Joy Cookies

The process isn’t too difficult. I started with my new favorite cookie cutter by Truly Madly Plastics, measuring 1.5 inches x 5 inches, and divided up my dough using another straight edged cutter to make 24 mini rectangles and squares.

tiles

Once the cookies are baked, ice the shapes with colors of your choice. I went a little non-traditional for Valentine’s Day by making a few light green and blue. After the base sets up, pipe words of love and admiration that will eventually make sentences. This could be done even easier by using food safe markers on the dried cookies, but I love to get out Mabel the KopyKake and practice my piping.

IMG_0381 word tiles

To dress up each cookie, I decided to add a small heart sprinkle to each tile. Just adhere them with a dot of RI.

tile cookies with sprinkles

These are the words I chose to put on my cookies. You can easily personalize them to your liking!

Cookie Poetry Tiles for Valentine's Day by Melissa Joy

After all are complete, share your treats and start drafting your Cookie Poetry! I had more fun creating sentences of love for my lovelies, than they did. That is usually the case. Mom=Big Kid.

IMG_0415

May your Valentine’s Day be full of love, joy, and as always, lots of sweets! ❤

Valentine's Day Cookie Tiles by Melissa Joy

%d bloggers like this: