Football and Baseball Valentine Cookies

It’s #teamallboy over here, so sometimes the cutesy valentines don’t cut it. By setting aside the pale pink icing for a minute or two, I’ve come up with a sports themed valentine set for those athletic kiddos and the sweet sayings to match!

Sports Valentine Collage

Here is a quick rundown on how to make these football and baseball valentine cookies, if you’d like to create some for your little sport!

For the football valentine, I started with a large, 4 inch heart cookie. Using a football cutter as a guide, I traced its shape onto my cookie at two different angles.

IMG_0496

Next pipe over the marked lines with a thick, brown icing. Flood the footballs with a looser consistency of brown, waiting a bit between the two, so the icing will stay segmented.

IMG_0500 IMG_0502

Once the icing has dried, add stitching details. Make a line down the center in white and pipe little hearts. I couldn’t decide which I liked better, only one heart in red or the lot of them, so I made cookies using each technique.

IMG_0508IMG_0507

Football valentine cookies…touchdown!

football valentine cookies-You're a Catch, Valentine!-by melissa joy cookies

The other football themed valentine cookie was made with the same large, heart shape. I don’t have a breakdown of photos showing how I created them (my bad), but they are pretty self-explanatory.

Start with a green base coat and let set. Outline the heart using the same green icing.  Pipe your “plays”, making sure to add “XOXO” and hearts in the correct positions. Next draw directional arrows with an edible marker. I used the FooDoodler brand for these because they have a nice fine tip.

Football Valentine by Melissa Joy CookiesFootball Valentine by Melissa Joy Cookies

Another football valentine cookie…score!

Football Valentine Cookie-I'm making a play for you, Valentine!-By Melissa Joy Cookies

And finally, a baseball valentine cookie. I’ve been saving this idea since last year and it couldn’t be easier!

Ice a round cookie in white. Once it is fully dry, make curved lines using a red FooDoodler. The lines will act as a guide for the heart shaped stitching. Remember that a stiffer icing for details will hold its shape better, especially for these tiny hearts.

Baseball Valentine Cookie How To

Baseball valentine cookies…home run!

Baseball Valentine Cookies-You're an All-Star, Valentine!-by Melissa Joy Cookies

My plan now is to have my dear, sweet husband create printable bag toppers to go with these sporty valentine cookies, which will make them perfect for classroom treats. Let’s talk him into that so I can share with you here, shall we? 😉

Valentine cookies for the sports lover…it’s definitely a WIN!

(This post linked to Kitchen Fun with My 3 Sons)

Proclaim Your Love with Cookie Prose!

If you’ve been following my blog, you know that I love to come up with cookie games. It all started with these Valentine domino cookies, which led to several cookie tic-tac-toe sets in various themes (find them all using the search on my “about” page). Oh, I haven’t abandoned the joy of my tic-tac-toes, but I wanted to come up with something different this Valentine’s Day. It’s such fun to give cookies that require a bit of play!

Cookie Tiles for Valentine's Day by Melissa Joy

This year I created cookie word tiles for my little Valentines so they could make cookie poetry…and then eat them, of course.

Cookie Poetry for Valentine's Day by Melissa Joy Cookies

The process isn’t too difficult. I started with my new favorite cookie cutter by Truly Madly Plastics, measuring 1.5 inches x 5 inches, and divided up my dough using another straight edged cutter to make 24 mini rectangles and squares.

tiles

Once the cookies are baked, ice the shapes with colors of your choice. I went a little non-traditional for Valentine’s Day by making a few light green and blue. After the base sets up, pipe words of love and admiration that will eventually make sentences. This could be done even easier by using food safe markers on the dried cookies, but I love to get out Mabel the KopyKake and practice my piping.

IMG_0381 word tiles

To dress up each cookie, I decided to add a small heart sprinkle to each tile. Just adhere them with a dot of RI.

tile cookies with sprinkles

These are the words I chose to put on my cookies. You can easily personalize them to your liking!

Cookie Poetry Tiles for Valentine's Day by Melissa Joy

After all are complete, share your treats and start drafting your Cookie Poetry! I had more fun creating sentences of love for my lovelies, than they did. That is usually the case. Mom=Big Kid.

IMG_0415

May your Valentine’s Day be full of love, joy, and as always, lots of sweets! ❤

Valentine's Day Cookie Tiles by Melissa Joy

Figgy Pudding Cookies

I have never eaten figgy pudding, nor do I exactly know what it is. I know the Muppets sang about it. Does that count?

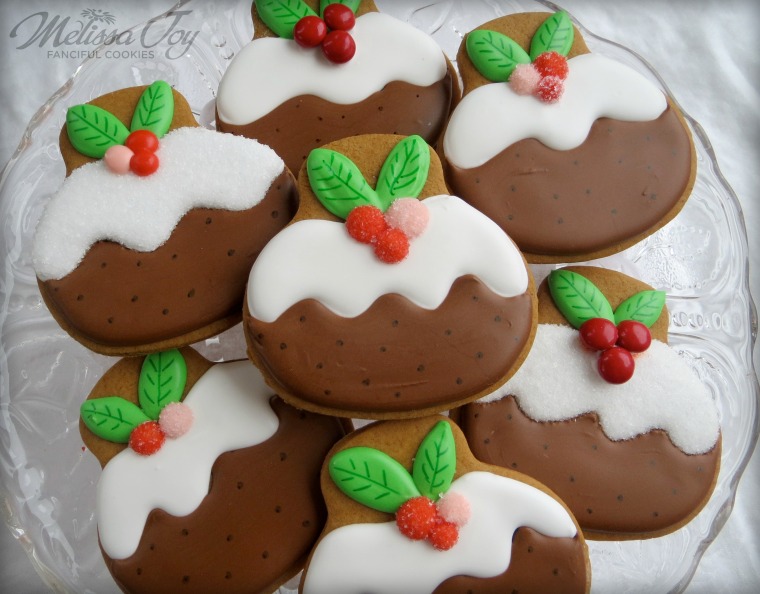
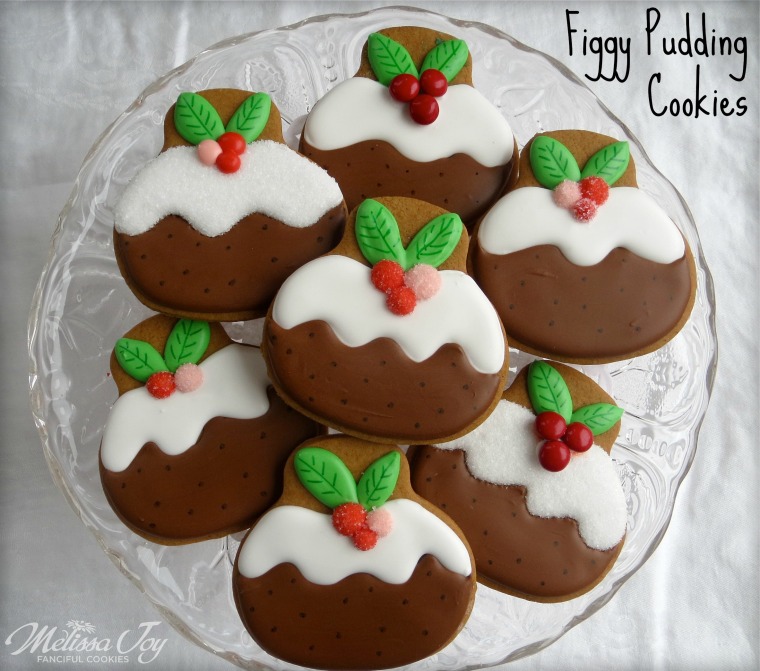
figgy pudding cookies by melissa joy

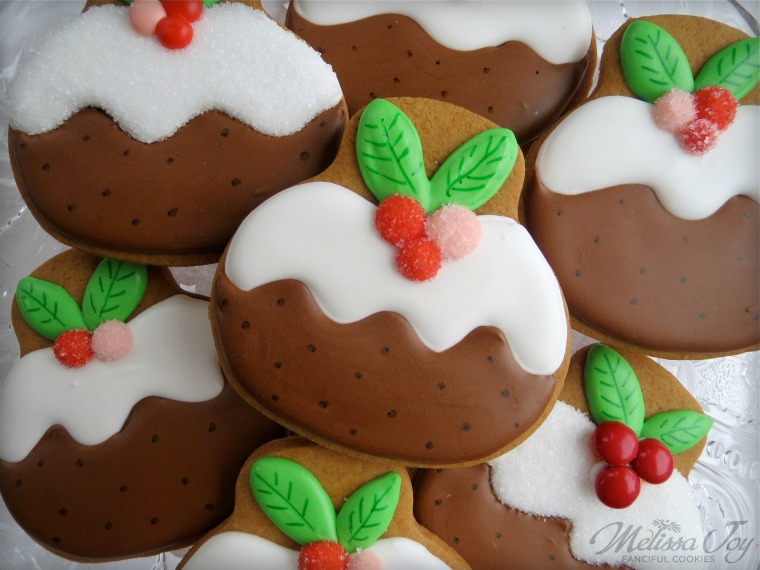
All I know is that I wanted to make a cookie version when I came across some darling felt figgy pudding ornaments on Pinterest. To clarify, these are cookies that look like figgy pudding, not taste like it. They are soft gingerbread. Mmmmm, gingerbread….does figgy pudding taste like gingerbread?

figgy pudding gingerbread by melissa joy

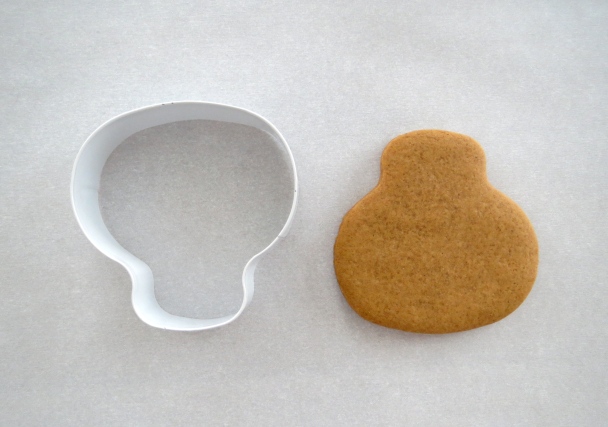
It’s a simple design that started with a skull cutter, which a cookie friend insisted I own. Why own this cutter? Because it’s so darn versatile! It can make figgy pudding cookies! Who knew! Well, she probably knew…she’s amazing like that.

IMG_0085

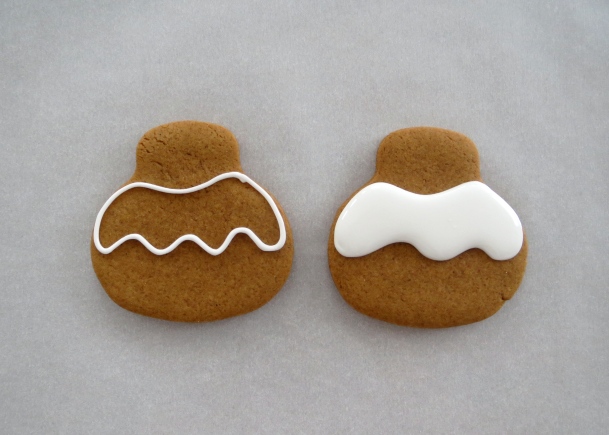
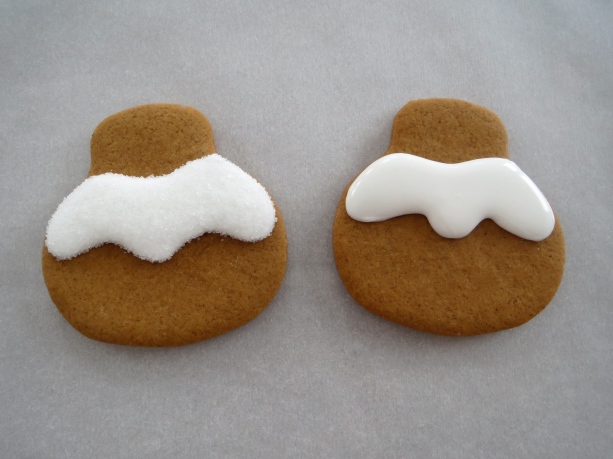
First outline and flood the icing portion of the pudding.

IMG_0088

I didn’t know which I’d like better; a sanding sugar version or a non-sugared version, so I did both. You should add the sanding sugar while the icing is still wet, if you go that route.

IMG_0089

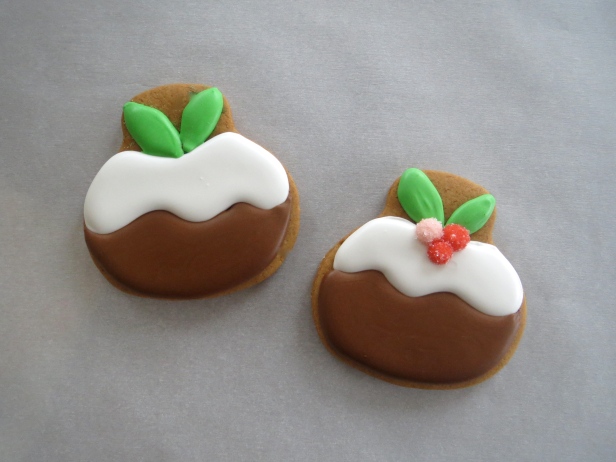
After that sets up, add brown “pudding” and leaves or holly greens to the top. My first idea was to create berries with icing and sugar, as shown…

IMG_0124

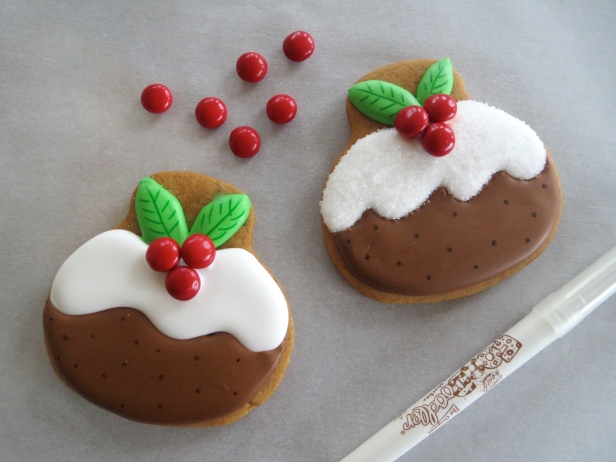
But then I realized I could make things even easier by using red M&M’s. I used minis here because I had them in the pantry. Adhere them with icing and you’ve got instant decoration. Gumdrops would also be an excellent choice for berries because of their sparkle, and who wouldn’t love a little sparkle with their Christmas pudding! I finished up the detailing with my trusty FooDoodlers.

Figgy Pudding Cookie How-To by Melissa Joy

Now, how easy is that?!

figgy christmas pudding cookies by melissa joy

Do you partake in figgy pudding? Or Christmas pudding? Are they the same thing? Man, I better do my baking homework…right after I eat a few these.

Christmas Tree Farm Cookies

As soon as I spied these straws, I knew exactly what I would make with them. That was in August.

awesomestraws

Their wood grain immediately had me thinking Christmas tree farm and the idea eventually became a classroom treat!

christmas tree farm sign cookie

First gather up your little trees, any design you please…

Christmas Tree Cookies by Melissa Joy

I used my wonderful FooDoodlers to help with the details of the sign and the Christmas tree faces. Edible markers make things easy peasy!

Christmas Tree Farm Cookie How-To

To assemble the tree trunks, cut the straws in half and put a squirt of icing on the back of each cookie. While the icing is wet, stick the straw into it. Dry them over night to make sure the trunks stay put.

Christmas Tree Farm Cookie How-To

Personalizing the trees with each student’s name would be a great alternative to a face, but you know I can’t stay away from a sweet little face…so faces it is!

Christmas Tree Farm Cookie by Melissa Joy

I can’t wait to share these with my son’s class! Thankfully, he’s still young enough to need classroom treats. 🙂

Christmas Tree Farm Cookies by Melissa Joy

Woodland Christmas Hedgehogs with Haniela’s

I’ve been immersed in a woodland winter wonderland of ideas just waiting to be created! The reason being that dear Hani, of Haniela’s, had asked me to be a part of a woodland Christmas collaboration, of which I enthusiastically said YES. The result on my end was this little holiday hedgehog, settling down for a long winter’s nap. Woodland Holiday Hedgehog by Melissa Joy Cookies

The origins of this gal came from the work of Naturalmente and the felt Winter Berry Hedgehog she crafted that I found on Pinterest (her Etsy shop has super adorable pieces!). I asked permission to cookie her hedgie and she sweetly agreed, then I sent the finished product to her in Hungary as token of my appreciation!

If you opt for an edible version of this holiday hedgehog, the steps are rather simple.

holiday hedgehog how-to

I had the perfect shaped cookie cutter for my hedgehog’s spines (you can find it here), but you could use a scalloped round or sunflower cutter just as well.

holiday hedgehog how-to by melissa joy

I love coarse sugar this season! It’s chunkier than sanding sugar, gives off a super sparkle and has a great crunch. I thought it gave a great textured look to the cookie base.

For the body, ice the oval first and let set a bit before doing the ears, so the stay segmented. I used CK black sugar pearls for the nose, but you could pipe it with royal icing as well. The pearls were one less color of icing to mix, which is always a win in my book!

holiday hedgie how-to by melissa joy cookies

I made sleepy eyes with my food writer and used icing for the feet and holly berries. Once the feet set up, you can add a small toe detail. After the two cookies dry, adhere them together with a squirt of icing.

Woodland Hedgehog Cookie by Melissa Joy

And with that, your holiday hedgehog is ready!

woodgrain cookies wafer paper snowflakes

While the hedgie is the main event, the background I put them on deserves a bit of mentioning. The long, rectangle cookies were iced with a woodgrain pattern using a wet-on-wet technique. The fun part came by embellishing them with wafer paper snowflakes that I sprayed with food color mist and cut out with a paper punch. A fabulous tutorial by my friend Yankee Girl Yummies about working with wafer paper can be read here. She’s a wealth of information and talent!

IMG_9555 IMG_9557

I adhered the snowflakes with a touch of corn syrup and my food-only paintbrush. The end of the brush helped to tack down the edges with a gentle tapping.

Woodgrain cookies and snowflake wafer paper

The result was a festive bed for my winter woodland hedgehog!

Woodland Christmas Hedgehog Cookies by Melissa Joy

If you love a woodland Christmas theme as much as I do, make sure you check out my co-collaborator Hani and her Christmas owls. Aren’t they great?! She’s done a video tutorial on them as well, which makes it even easier to learn how to create them!

Christmas Owl by Haniela's

What a festive way to celebrate the winter holiday!

Woodland Christmas with Haniela's and Melissa Joy

Woodland Christmas Log Cookies

When you’re a baker, holiday cookie designs begin long before it’s appropriate to even think about Christmas. You can ask just about any of us crazies, and we will admit to it. We also have a hard time keeping them under wraps until after Thanksgiving, and a few ideas may sneak out before then, but we can’t help it. We are too excited!

woodland tree log cookies by melissa joy
For Christmas inspiration, I’ve had an ongoing holiday Pinterest board and these wood log cookies were my first to create from it. It seems like I am not the only one to jump on the woodland theme this year, and for sure, I will not be the last. I love to see everyone’s interpretations! Wood Log Cookie by Melissa Joy Cookies
Here’s my little how-to on creating a bit of woodland cookie love for your holiday table. I started with this gingerbread recipe from Sweetopia, but altered the spices a bit. The recipe is fantastic and delicious! I highly recommend it if you like a soft crumb, and the dark brown cookie makes a great base for icing, in my opinion.

woodland log how-to by melissa joy

I didn’t have the exact shape I wanted for this design, so for several cookies I had to “cut and paste” the dough together to make a leaf addition to the side. Once the decoration is on, you’ll never tell! I used coarse sugar on the edges, instead of sanding sugar, to convey a more bark like quality. It also has a great crunch! Let these steps set up for a bit before moving on to the next.

woodland log slice how-to by melissa joy

Those swirls are super easy to do. I started in the center and worked my way out, stopping and starting the flow of icing as I went to create a woodgrain look. It doesn’t have to be perfect because a rustic feel works with these! You could try this technique wet on wet, but I liked the texture of this method better.

woodland log cookie how-to by melissa joy

I wanted to make these wood log cookies have a Christmas feel, so I added a tiny holly decoration. And a mushroom to a few. They were too darn cute not to be added. 🙂

woodland log cookies by melissa joy

I’m not sure these log cookies say “Christmas” enough, but maybe with a few snowflake or tree cookies along side them, they could work as a great holiday platter.  Or maybe a few woodland critters in winter weather gear? If I get around to something like that, I will be sure to share it here. Or if you do, let me know…I’d love to see what you create!

woodland christmas log cookies by melissa joy

Let the holiday baking commence!


Linked to: Kitchen Fun with My Three Sons

A Cookie Tree of Gratitude

Here’s a short post on a fun Thanksgiving treat for your family get-together next week, because who could turn down cookies, even if there is pie?

Gratitude Cookie Tree by Melissa Joy

I put a little twist on the Gratitude Wreath Cookie I made last year with my kids, and created this Gratitude Tree platter. It’s sort of like a family tree…the family shares their gratefulness on the cookies and then said family eats them. I came up with the idea from inspiration by CookieCrazie and her Autumn Tree set (which is amazing!), and that reminded me of the flowering tree platter I made last spring for Earth Day. See how the cookie ideas sort of influence one another and morph into something new? It’s hard to keep track of who originally came up with what, but in the end, it’s all really just deliciousness anyway.

accent leaves for gratitude tree cookies

For my tree, I kept it super simple. Easy sanding sugar leaves for an accent…

Gratitude Cookies by Family

to go with the smooth iced leaves, ready for messages of gratitude. Use a food writer and gather the gang around to pen their notes of thanks.

Gratitude Tree Platter

I added a tree trunk, and the extra cookies were practice for piping letters with my new KopyKake. I love that machine. I’ve named her Mabel, if you’d like to know. We will have a wonderful Christmas together, me and Mabel.

Gratitude Cookie Tree Platter by Melissa Joy

Build your platter like so, bask in the abundance of thanks, and share with those around you.

Have a wonderful Thanksgiving of gratitude!

Easy Ghost and Mummy Cookies for Halloween!

It turns out my youngest is a bit scared of Halloween this year. So much so, he may choose to stay home instead of trick-or-treating. Not even the lure of candy will get him out there. I’m not sure what spurred this sudden wariness about the holiday, but I know he’s freaked out by the creepy stuff, and that I completely understand. I have never been to a haunted house, enjoyed being frightened, or wanted to watch gory movies. Blech. Call me a wimp, but it’s just not my thing. In my world, Halloween is full of cute stuff.

ghosts and mummy cookies by melissa joy

To help him cope with his worry, I decided to try and make the sweetest Halloween cookies I could and these were the result. SO CUTE, right? Not only that, but pretty easy too! I’ll show you just how easy, starting with the ghosts…

Easy ghost cookie how-to by Melissa Joy

1. My ghost cookie was made with a skull cookie cutter, just the right size for the design. The first step is making the head and giving it a little swirl at the top. Place the candy pearl eyes in position while the icing is still wet. I forgot a few times, and well, they don’t stick when the icing sets! Alternatively, you could pipe the eyes on, but I liked the look of the pearls better.

2. Allow the head to dry a bit, then give the ghost a body. I gave the “girl” a scalloped bottom and the “boy” swoosh.

3. After this has set several hours or overnight, you can add the details. Little lashes for the girls and eyebrows for the boys using a food writer. The ladies got a flower candy sprinkle and a bit of bling, while the boys received a bow tie made with two heart sprinkles and a dot of RI. Add a sweet smile and you’re DONE!

Easy Ghost Cookies by Melissa Joy

Not so bad, right? Next up, and my favorite of the two designs, an easy mummy cookie!

Easy Mummies Cookies How-To Part One

1. The dough started out as a bear, but with an quick trim, it became the perfect mummy body. A gingerbread cookie cutter would work as well.

2. Ice the head and body and set the candy pearl eyes in place. Just a note that I use the CK brand of sugar pearls. I found the Wilton black pearls to bleed a lot and that really annoyed me. (A special thanks to Make Me Cake Me for her help on this matter! 🙂 )

3. I added the arms and legs and shaped them a bit with my scribe tool as shown.

Easy mummy cookie how-to part 2

4. Let the body dry for several hours or overnight. Add lashes with a food writer for the ladies and eyebrows for the guys. It is a good idea to place the features now and work around them in the next step. If not, your lines can get in the way of his/her face.

5. Using a thicker black RI, go willy nilly with your mummy wrap!

6. You can add a flower sprinkle at the top for the girls and as a boutonniere for the boys, using a drop of RI to adhere them. After that, you’re finished!

Easy Mummy Cookies by Melissa Joy

Come on now…there is not a stitch of spookiness with these Halloween cookies, is there?! They should pass the ultimate cute test. All treats, no tricks, I say!

Go Bo! Foundation.org

Once these were finished, I decided they would be perfect as my contribution to an amazing event, the GO BO! Foundation Bake Sale. Held in Door County, WI, this will be the third year of cookies that Pay It Forward and in a BIG way. Cookie artists from every state and many countries have agreed to donate their sweets out of LOVE and COMPASSION, to raise money in honor of an incredible boy who lost his battle with cancer, and who’s mother created a foundation set up in his name. As bakers, we are just trying to live out his wishes to be kind to each other and help one another out, the best way we know how…by sharing our talents to do good, one cookie at a time.

You can read Bo and Annika’s personal story here (make sure you have tissues), find out about the epic bake sale on the Facebook page Go Bo Foundation Bake Sale, and learn more regarding the foundation at www.gobofoundation.org.


Back To School Tic-Tac-Toe Cookies

It was right before we left for our last vacation of the summer that I thought of the idea for a back to school version of my tic-tac-toe cookie obsession. I think I’ve done five different themes so far…maybe six…

tic tac toe back to school cookies by melissa joy

Even though I am in denial I will have to set an alarm and drag the kids out of bed to get ready in the morning, I must be subconsciously preparing myself. I know there are some of you that have already begun, but I’m not rushing our after Labor Day start of the new year.

Mini back to school cookies by melissa joy

To make the kids transition a bit easier too, I figured a cookie game might help shift their mindset. A little anyway. And speaking of little, here are the mini pieces I chose for my back to school tic-tac-toe set…

Back to School Mini Cookies How-To by Melissa Joy

I decided on these five designs and worked with what cookie cutters I had. Just a note that I did trim a small part off of the square to make the notebook paper more rectangular. The pencil was made using a mini holly leaf with the sides trimmed like so:

Mini pencil cookie how-to

Mini cookies can be tedious to make, but turn out so darn cute. Especially with a tiny smiley face. I can never resist the face!

back to school tic tac toe cookie by melissa joy

Here is a brief lowdown on the tic-tac-toe cookie board, if you are so inclined to make your own. It measures around 6 inches by 6 inches square…

Chalkboard Tic Tac Toe Cookie How-To by Melissa Joy

Not so hard, right? An “A+” for you!

Back to school cookie game by melissa joy

We’ve only got 6 days left to enjoy the city pool before they close for the season, so I’ve kept this post short and sweet and full of photos.

Priorities, you know.

Back to School Tic-Tac-Toe Cookies by Melissa Joy

Enjoy the last of the summer, if you’re not in your desks yet, and wishing you all a stellar school year!


Uncle Sam Cookies

Doesn’t it seem, every year, in a blink of an eye it’s July 4th?! I decided to get ahead of the game this year. I spotted a few Uncle Sam items in the craft stores months ago and tucked that little bit of inspiration away for future cookies. See? It’s not such a bad thing they get the decor out WAY too early. While many scoff at this insane notion to stock shelves with holiday merchandise LONG before it’s appropriate, I am snapping pictures with my phone and making mental notes for cookies. It’s a sickness, this baking addiction.

Uncle Sam Cookies by Melissa Joy

I am feeling that in the cookie world, old Uncle Sam could be the new trend for the 4th of July holiday. Like sweet Mrs. Claus was this past Christmas, after this awesome creation by Sugared Hearts Bakery made the Facebook rounds. It inspired many of us cookie peeps to make a version of their own. Me included! But, we’re not talking Christmas in July here, we are talking actual JULY. Though I did use Santa cookie cutters to make Uncle Sam….so maybe we are…it’s a blurred line.

Uncle Sam Cookies by Melissa Joy

Here’s a little info on how I created my man, Uncle Sam. I created two versions, one with a few less steps than the other. Let’s start with the bigger guy!

Big Uncle Sam Cut Out How To

These are the cutters I used to get the desired shape I had in mind. Think big beard and tall hat, then dig through your cookie cutters for the right look.

Big Uncle Sam Cookie How To

Decorate as shown above. I let each section dry a bit before moving on to the next.

Uncle Sam Cookie by Melissa Joy Cookies

Add face and feature details. I added a few star sprinkles to make it extra festive.

Uncle Sam Cookie by Melissa Joy

Big Uncle Sam cookie finished, but he needs a buddy! Moving on to the little Sam then…

Small Uncle Sam Dough How To

This design was one I wanted to try based on the Santa Gnomes I made this past Christmas.

Small Uncle Sam How To

Again, I let the icing dry a bit before moving on to the next section.  Add a nose after these steps are done.

Uncle Sam How To by Melissa Joy Cookies

Let him sit overnight so he’s dry enough to add the hat decoration, using a food coloring marker. This specific brand of marker is made by Ateco, which has a wider tip than my usual favorite, the FooDoodler.

Uncle Sam Cookie by Melissa Joy Cookies

Little Uncle Sam cookie! Not sure which version I like better…but it’s like with your kids, you can’t play favorites.

Uncle Sam Cookies by Melissa Joy

Have a wonderful 4th of July!

Looking for more Independence Day cookie ideas? Check out my bunting cookies, stars & stripes cookies, or cookies for the troops from the Melissa Joy archives.


This post linked to: Kitchen Fun with My 3 Sons, The Cookie Puzzle